Showing posts with label ornament. Show all posts

Cookie Ornaments

For several years, I've been meaning to make cookie ornaments for my Christmas tree. I've had the best intentions (and we all know where that road leads). I even went so far as to buy the air dry clay and a set of Wilton's small Cookie cutters, but time got away from me and when I was finally ready to knead, roll, and cut, I discovered the air dry clay had become a rock solid brick. Another excuse to procrastinate. 

Three Christmases have passed without cookie ornaments for my tree.

So, yes, this blog post is a little off season. Am I spectacularly late for last Christmas or obnoxiously early for next? You can be the judge. But on my list of 2026 intentions was a set of cookie ornaments and as January comes to a close, I can happily report they are finished. 

I picked up a fresh package of terra cotta air dry clay and after all of last year's Christmas decorations had been put away, I found myself sitting in my office conditioning clay. Thinking I may want to use the cookie cutters for their original purpose in the future, I covered the rolled clay with a piece of plastic wrap so that the cutters wouldn't come into contact with the clay. I cut two of each shape and then a few extra for good measure. 

After letting them dry for a few days, I painted them with burnt sienna matte acrylic paint. Then I added the "royal icing" using dimensional paint. Unfortunately, the paint wasn't as puffy as I'd hoped -- it sort of collapsed as it dried. I decided to paint over it with glue and add glitter because glitter fixes everything. It also goes everywhere, so my final step was to spray them with a clear coat to limit future clean up. 

And voila! Little gingerbread cookies for my Christmas tree! 2026 Janice gets a gold star! ⭐


Crappy Craft Night

For the past six years, my sister and I have held an annual Crappy Craft Night in the week before Christmas. It's become one of my favourite nights of the year filled with friends, food, laughter, and -- of course -- crappy crafts.

Now, I've always been a crafty sort; my sister less so (though she does enjoy putting together model cars). And usually in my stocking, I would find a small craft kit to make an ornament at Christmastime. What I found about these craft kits is that they often were poorly conceived and assembled, with materials missing or incomplete instructions. Even as an accomplished crafter, it could be difficult to achieve the end result pictured on the package. I often ranted about this to friends and family.

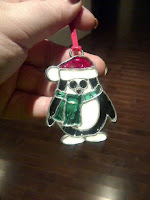
Then one year, my sister happened to be in St. John's before Christmas and picked up a few children's craft kits at Michaels. We had a craft night in her living room, with a fire, some wine, and a few nibbles. We did more laughing than anything else as we assembled our crafts, realizing that no child could possibly successfully complete them (at least such that they resemble the package). In those early years, there was a strange penguin made of a gritty clay and some foam that never stayed together despite trying a variety of glues, a polar bear made of white pom poms, and wooden ornaments that you simply coloured with markers (the most successful of the lot). There was also this fellow:

This felt penguin, made by my sister, looks cute enough. But what you can't see is how the pieces of felt weren't cut to the right lengths (so that green band doesn't meet up in the back) and how the glue didn't actually hold the felt pieces together properly (so his red hat is partially open on the sides). That the jingle bell stayed on at all is a Christmas miracle.

Part of what made these early craft nights so funny was that my projects always seemed to work out, while my sister's were (at least in her opinion) utter failures. Of course, the kit was usually the problem, but I'm not sure my sister believed me when I said that.

For sheer entertainment value, we decided this had to become an annual event and began inviting friends to participate. Each participant was to pick out a child's Christmas craft kit and bring enough of that craft for everyone to make one. Purchasing the kits from dollar stores or the discount section of Michaels was strongly encouraged.

Over the years, we've made paper snowflakes, jingle bell snowmen, perler bead ornaments, felt Santas, decorated gift bags... The highlight of one year was the Makit and Bakit "stained-glass" ornaments that had to be baked in the oven so that the coloured plastic pieces melted together (the fumes nearly killed us).

For the fifth anniversary of Crappy Craft Night last year, we decided to decorate gingerbread houses using kits. The kits, of course, contained old, dried out royal icing and therefore were epic failures -- which only made the night better. I didn't have a kit, because I'd arrived home from Cape Breton so late that there were none left in Corner Brook (Trooper Ron drove me all around town, certain that we'd find one somewhere, but we were unsuccessful). I ended up buying the pieces for a train at Bulk Barn and making my own royal icing.

And this year -- 2017 -- we had a Crappy Craft Night: Paint Night Edition. We all followed a YouTube tutorial to paint a snowman (click here if you're interested in trying that out yourself). We bought crappy acrylic paint and brushes, and Trooper Ron made some impressive easels out of kindling in just 15 minutes, and we tested our abilities to follow the tutorial. There was a sense among some that the video was too advanced -- but everyone finished it and all of the paintings looked great in the end. It definitely was one of the more intense Crappy Craft Nights, though.

You see, it may just be Crappy Craft Night, but we're all pretty serious about it.

And the marker of a great CCN is when we laugh so much that my sister needs her Ventolin inhaler.

This is by far one of the best Christmas traditions ever and I can't wait for the next Crappy Craft Night, when we'll return to the original crappy kid's craft kit format!

Shimmering Acorn Ornaments

About a year ago, I stumbled upon a photo of painted acorns on Pinterest. They were very pretty and it was suggested they could be used in a glass container as seasonal decor. I thought they might make very cute Christmas tree ornaments if I could figure out how to put a hanger on them. I pinned the idea, but left it untried because I didn't have a source for acorns.

Fast forward to this month, when I went on a trip to Toronto. There was an unexpected side trip that my host probably didn't think I'd enjoy. In fact, he warned me that as we pulled into our destination, I'd hear acorns being crushed under the tires of his car. "Did you say acorns?!?!?" "Yes, acorns." "AWESOME!" While he attended to his task, I picked as many acorns as I could hold in my hands up off the ground. I sealed them in a plastic bag until I got home.

Yesterday afternoon, I opened my ziplock bag and emptied the contents onto a baking sheet. I then put the acorns in the oven for a few hours to kill any nasties that might be living in them. Once cool, I noticed a few of the caps had popped off. Perfect!

I made a few hangers and glued the caps back in place with the hangers between the caps and the acorns. Then I left them to dry overnight.

I should note that in the future if I was to make these again, I'd probably try to drill into the cap near the stem and put a small eye hook in for hanging -- but I don't currently own a dremel or drill (that will hopefully be remedied this Christmas!).


Today, I took a trip to Michaels to purchase some metallic paint. I used to have a lot of craft paint on hand, but much of it was getting old, so I tossed it all and have been buying what I need as the need arises. I wasn't sure what colour I would buy when I went, but once there I decided that copper would be the perfect colour.

Tonight, I painted the acorns and left them to dry hanging from a wooden spoon propped on Mason jars. I also painted the others and propped them on their caps to dry.


I'm very happy with the way they turned out and think they'll have a nice shimmer next to Christmas lights on a tree. I may add a clear coat over top to protect them -- we'll see.

What colour would you paint your acorn ornaments?


Wood Burning Ornaments

When I was sick earlier this year, I took up wood burning. I started thinking that making ornaments might be fun and found inspiration on Pinterest. I went out and purchased a few wooden rounds to test, but didn't find time to get back to the project until last week.

I started out with two basic ideas, just to get back into the groove. What I've discovered is that the wood that these rounds are made out of is really soft and leads to an uneven burn if you're not careful. Still, I like the way they turned out. I'm thinking I may stain them more of a golden colour, since the wood is so very, very pale. Hanging from a red ribbon, I think these will make a nice gift.

I saw a few cute designs on Pinterest that featured foxes, so I may try something like that next month when I have more time.

What would you like to see on a wood burned ornament?