During the reorganization of my chocolate supplies a few weeks ago, I found a heart mold that I had purchased during my professional chocolatier program but never used. With Valentine's Day quickly approaching, it seemed like an ideal opportunity to test it out. And then after reading through ganache recipes one Tuesday night, I was inspired to try making a milk chocolate heart filled with dulce de leche and espresso ganache.
I chose milk chocolate for a few reasons. First, I have a lot of it because I primarily use dark chocolate in my production. Second, because I gravitate toward dark chocolate, I don't have enough experience tempering milk chocolate. As well, I haven't employed the piping bag method of shelling chocolates using milk chocolate. Guaranteed to be more tricky than dark chocolate, I wanted to try it. And practice does make perfect, right?
These dulce de leche espresso hearts were a multi-step process: decorating the mold, shelling, piping the dulce de leche layer, piping the ganache layer, capping, and packaging. I spread these out over two weeks partly to make it more manageable and partly because I didn't realize how close February was and didn't buy cream with my groceries (and after 16 hours of writing spread over two days, I just didn't have it in me to run out to the store).
Session One: Decorating and Shelling
I began by tempering some coloured cocoa butter to decorate the mold. Now, I just have to say that I was thrilled to finally try this again, since I hadn't done it in years. I purchased gold Roxy & Rich cocoa butter back in December when I replenished my dark chocolate supply. I've wanted it since 2018. And now it is mine! (My precious...)
Tempering coloured cocoa butter is easy. It just requires patience. You remove the cap from the bottle and pop it in the microwave for 10 seconds, then remove it and shake. Then another 10 seconds, remove, shake. And another 10 seconds, remove, shaky-shake. You get the picture. You progress in this fashion for about 1 minute and thirty seconds and eventually some of the cocoa butter melts while some of it remains solid. And by shaking, you ensure the temper of the cocoa butter.
I dispensed a small amount into a pinch bowl, rolled a latex cot over my finger (thank you Shoppers Drug Mart), and then finger painted the molds. I decided to swipe only once from top right to bottom left, and in less than a minute I was done. The encouraging part of it all was that the gold cocoa butter began to solidify almost immediately, so I knew it was in temper.
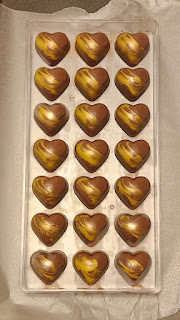
Next, I tempered 350 grams of milk chocolate and filled a piping bag. Using the "human depositor machine" method, I filled each heart, tapped the mold to remove air bubbles, and then inverted the mold to let the excess chocolate drain out onto a piece of waxed paper. Then I placed the mold on a tray in the fridge for 10 minutes. Now, I didn't quite get all of the air bubbles out and the shells are a bit thick in spots, but I was happy with the results nevertheless. It's a much cleaner way of working and in the future if my chocolate is just a little warmer and I tap it a little longer, I think I can solve the issue of it setting too quickly. (Yes, this means there will be more milk chocolate bonbons molded in the future.)
At this point, I set the shelled mold aside to await the next steps.
Session Two: Layering Dulce de Leche and Espresso Ganache
The second production session occurred on a Sunday morning, passing the time during snowmageddon. I started by making a small batch of milk chocolate espresso ganache, so that it could cool while I was piping the dulce de leche layer. I measured heavy cream, butter, espresso powder, and milk chocolate into a bowl and went the old-fashioned bain marie route to melt it all together. About 10 minutes later, I had a beautiful ganache. I removed it from the heat to cool.
Next, I poured my dulce de leche into a piping bag. With right hand applying pressure by squeezing the bag and left hand controlling the flow by pinching about a half inch above the opening, I very slowly deposited a small amount of dulce de leche into each heart. The dulce de leche was very fluid and shouldn't set while inside the chocolate, so the hearts should ooze when bitten into.
Then I checked the temperature of the ganache. While it was starting to set, it was still 37 degrees -- far too hot to pipe into the mold because it could take the shell out of temper. I gave it a good stir and left it for ten minutes. Still too warm when I checked it, I left it for another fifteen minutes. When I returned, it was at 27 degrees, so I knew it was safe to pipe.
Using the same method as for the dulce de leche, I quickly piped the ganache over the first layer. This part was tricky. To avoid the heavier ganache sinking through the dulce de leche and creating a total mess, I had to pipe at an angle across the surface of the dulce de leche faster than it could ooze upwards. For the most part, it appears to have worked well. With a toothpick, I knocked down any ganache peaks that were high enough to impede capping. Then I left the ganache to fully crystallize on top of the dulce de leche.
Session Three: Capping
Still snowed in, the third session occurred early on a Tuesday morning. I gathered my supplies (chocolate, a silicone bowl, a piece of acetate, and a drywall knife), and prepared myself for capping. It can be tricky business and it's critical for shelf-life.
First I tempered a small amount of milk chocolate (but also about 4x more than I needed). After two temper tests to ensure it really was going to set properly, I spooned three lines of chocolate onto my mold -- one at the top of the mold, one along the second row of hearts, and one about half-way down the mold. Then I lined up the edge of the acetate with the edge of the mold and scraped across the full mold with the drywall knife. I've tried this method several times, but this was the first time that I got the right amount of chocolate on the mold. After admiring my work for a brief second, I cleaned up the edges (and snapped a photo) and put the mold into the fridge for 13 minutes.
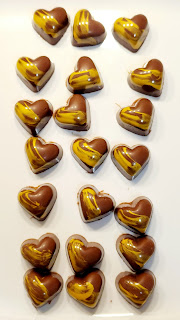
Next, I inverted the mold onto a tray and lifted it to see if any would fall out on their own. None did. In the past, I have tapped the edge of the mold on the counter to release the chocolates, but inevitably a few (or many) would come out cracked as a result (I guess I was probably tapping with too much force). So, instead, this time I tapped the mold with a wooden spoon, as I had seen in an Instagram reel by Kate Weiser Chocolate. Sure enough, one by one, the hearts dropped cleanly from the mold. And when I moved aside the mold and spoon to assess my work, I was absolutely thrilled. The shine on the chocolates was incredible.
Session Four: Packaging
A few days after finishing these hearts, I checked my stash of packaging and confirmed what I already knew: I didn't have anything suitable for single chocolates. I have a large quantity of 2-piece and 4-piece boxes, as well as a variety of cellophane and paper bags. Alas, nothing for one piece. It was time to get crafty.
And so I went onto the Silhouette Design Store to look at cut files for boxes. Eventually I found a simple triangular box that should work. I downloaded it and began manipulating it to get the right size and fit as many on a single piece of cardstock as possible. After a few tests, I cut one dozen boxes and assembled them.
I popped each chocolate into a mini cupcake liner (so that the chocolate wouldn't come into contact with the cardstock that I used) and then carefully slid one into each box. I folded down the flaps and closed the boxes with heart stickers. Then I put them in an airtight container to await their delivery.
Final Thoughts
As I finish writing this blog, I haven't tried one of my dulce de leche espresso hearts yet. I've tried all of the components, but I won't know how they work together for certain until sometime next week when I permit myself to indulge. But I can say that I'm very pleased with how they came together. The design is precisely what I envisioned, the milk chocolate is in perfect temper, and thanks to new production techniques the work was more controlled and cleaner. And this is the first time ever that I've had all pieces completed in sellable condition - no major bubbles, no marred finishes, no cracks, and no bloom.
In short, I'm thrilled.
Happy Valentine's Day or Galentine's Day or Whatevertine's Day!
Any excuse to eat chocolate, am I right?


