Showing posts with label chocolate. Show all posts

Coconut Chocolate Bars

When I was a kid, my favourite piece in the Moirs Pot of Gold chocolate collection was the toasted coconut cup. While I clearly liked the flavour, equally enjoyable was the sound of the cup peeling away from the chocolate. As I recall, I wasn't the only one who liked it (indeed, my sister and I may have fought over it), so it was particularly special if you were the first one to the box. 

While completing my chocolatier program, I stumbled upon Hercules Candy. They were still producing chocolate in their basement at the time and I learned a lot about small batch processes by watching their videos, including how to make cherry cordials. They also made nut cups and I was impressed with the wooden tray they had manufactured to hold the cups while being filled. That summer, my father made one for me. 

As I began creating assorted chocolate collections for holidays, I made use of the tray. More often than not, I used it to hold cups while I filled them with a meltaway mixture. Sometimes I made solid pieces with fruit and nuts. But to my knowledge, I've never used them to make coconut cups or clusters. It occurred to me recently that a coconut bar would be just as delightful as the cup -- and perhaps more so because a bar would mean more chocolate! As I prepared Easter eggs to send home to my family, I decided to test a silicone mold I'd purchased online to make small coconut bars that I could add to my flat rate box. (Might as well stuff it with as much chocolate as possible!)

I tempered 200g of milk chocolate and added 20 grams of coconut. Once they were well combined, I began filling the mold. After tapping the mold to release the air bubbles, I popped the tray in the fridge to set. Fifteen minutes later, I had seven delightful little bars! After they fully crystallized, I wrapped them in foil and added a sticker to the back. 

These are delicious -- the perfect little ~25g treat! I also love the patterns picked up by the foil wrapping.   


Three-Part Molds

A recent innovation in chocolate molds has been the introduction of three-part molds. Targeting home candy makers, they are meant to make the process of molding easier, but I've always wondered if they work. Naturally, when I found one on clearance at Michaels for $3, I had to buy one.

Three-part molds are comprised of: (1) the mold itself, which has a fill line; (2) a flexible insert that is about 1/8" smaller than the mold; and (3) a rigid cap that presses the flexible insert into the chocolate, causing the chocolate to rise up the sides of the mold. The result is a shell with even thickness (more or less). One of the key benefits is the flat edge that it creates; the thicker "wall" of chocolate enables the two pieces to then be assembled with better alignment. 

This all sounds good in theory, but what's it like in practice? I picked a mold out of my collection to test. 

Well, I can tell you that the first challenge to present itself was the visibility of the fill line when looking down at the mold. It couldn't be seen. At all. The line was only truly visible, at least to my bespectacled eyes, when the mold was held up to a light on an angle. That doesn't really facilitate filling the mold with melted chocolate. As a result, it's easy to add too little chocolate -- resulting in gaps -- or too much chocolate -- causing it to overflow (and requiring subsequent trimming). It might help to mark the line on the outside of the mold with a piece of tape or something similar.

After the chocolate sets, the flexible inserts must be removed before unmolding the shells. Unlike harder plastics that release easily from set chocolate, the flexible inserts seemed to hold on a little more than they should. And, not unlike many silicone molds, they created a dull surface to the chocolate. While this isn't a major problem, because the inside isn't seen, it certainly added to the time required and resulted in additional clean up. 

Despite these issues, the mold did produce a shell with even thickness and a good "foot" for assembly.

Unfortunately, it turned out that the first mold I chose to test had a design flaw. The neck joining the bear's head to its body was particularly thin. This created a weak spot between the large head and body. Unable to support the weight, it cracked during the unmolding process. Upon examining it, I feel fairly confident that cracking would be the rule rather than the exception with this mold. 

Undeterred, I still filled the bear with candy and assembled the pieces to create the 3D figure. It's very cute! In the future, I may use it for a filled or solid confection. I may also experiment with replacing the third piece of the mold after removing the flexible inserts and before tapping out to see if that helps to support the chocolate and reduce breakage. And, in any event, it's possible to hide the flaw by adding a ribbon around the bear's neck or adding some decoration with royal icing or tempered chocolate. 

Fortunately, this sort of weak spot doesn't appear in most of the other 3-part molds that I purchased. The sphere, diamond, and cupcake are definitely safe -- confirmed with milk chocolate. The champagne bottle, which I haven't yet tested, may present some problems only because the neck of the bottle is so narrow. We'll mark that TBD when an appropriate occasion crops up to test it. 

Until then, I invite you to appreciate how cute this chocolate bear's tail is! 


Chocolate Easter Squirrel

Several years ago, perhaps during the pandemic, I treated myself to a Ferrero Rocher Squirrel for Easter. It caught my eye because it was different (i.e. not a bunny or an egg), but also because I was feeling a bit homesick at the time and was attracted to it because my father's nickname for me is Squirrel. I didn't read the label or pay much attention to the ingredients. I just had the gold-wrapped hazelnut chocolates in my mind. When I cracked it open on Easter Sunday, I discovered it was a hollow 3D chocolate figure. While I would have preferred a little more chocolate (given the cost), it had me contemplating what I would mold for Easter if I ever opened my own chocolate shop -- could chocolate Easter bears be a thing?

Fast forward to the present. As you know, last week I tried my hand at molding hollow 3D chocolate eggs for the first time. As I reflected on the results, I couldn't help but think that, unless there was a surprise hidden inside, they were a bit boring. I thought about the many chocolatiers who have taken to painting their molds in a Jackson Pollock-style splatter, turning their eggs into works of art. I did something similar a few years ago. Others have added candy, sprinkles, caramels, or other confections inside the egg. Last year, for example, I had a Peace by Chocolate hollow dark chocolate egg that held little white chocolate chicks and came with violet seeds. 

The Ferrero Rocher Squirrel is unique because it uses chocolate with inclusions to shell the mold instead of using nuts as a filling. The only other product I can think of using a similar technique is the soon-to-be-extinct Cherry Blossom. I wondered how the inclusions might impact the temper and fluidity of the chocolate, and by extension the ability to properly coat the mold, particularly when producing a hollow 3D piece by hand rather than in a factory with specialized equipment. I decided to try it out.

I combined some leftover dark chocolate with milk chocolate and tempered it. Then I added some chopped peanuts. After adding the mixture to half of the mold and clipping the second piece in place, I slowly rotated the mold in various directions to coat it. Then I popped it in the fridge, followed by the freezer, before unmolding. Now, this is where things went wrong. I was impatient. Instead of popping the mold back in the freezer for a few more minutes, I tried to release the mold even though I could see one section where the chocolate hadn't yet contracted away from the plastic. I cracked the egg. 

As you can imagine, I was disappointed, but at least I had proof of concept that this type of shelling was possible by hand. The following day, I melted down the cracked egg, tempered the chocolate, and tried again. This time the egg popped out of the mold easily and I could see the flecks of peanut throughout the semi-dark chocolate surface. 

I appreciate the beauty of the unadorned, well-tempered shell. And I think anyone eating this will enjoy the surprise of peanuts throughout. Because it was done by hand, the chocolate is thicker than that of the mass-produced chocolate squirrel, but no one's ever complained about more chocolate, am I right? Most importantly, though, it's a new approach to shelling that may have other applications in the future. 

Hollow 3D Figures

While I didn't pursue a professional chocolatier program until 2018, my first introduction to chocolate making came while I was around ten or eleven years old and part of a Girl Guide troop. One Wednesday night, we gathered in the basement of the Salvation Army temple and our troop's leader demonstrated how to make various solid and filled bonbons. Of course, she was using Wilton candy melts (compound chocolate) instead of "real" chocolate, so there was no tempering involved, but we learned processes for shelling, filling, and capping. I remember the chocolate being kept warm with an electric skillet, the molds being painstakingly painted with a Testors paint brush (the kind you use on model cars), and the can of condensed milk that had been transformed into caramel by boiling it. I was hooked. And my dear parents indulged my interest, taking me to the religious book and bible shop in the mall, which for some reason was the place to buy candy melts and molds. 

I've come a long way since then. But every now and then I think back to one of the techniques she talked about that night -- creating hollow 3D figures. She described two-part molds that snapped together. You would pour some chocolate in one piece, snap them together, and then rotate to coat the mold until the chocolate solidified. It sounded easy enough, and at some point I used my allowance to buy a 3D Christmas tree and a 3D Santa mold, but I never tried it.

While hollow 3D figures wasn't part of my professional chocolatier program, as I engaged in research for various assignments, I stumbled upon videos demonstrating how 3D molds are used in factories. Instead of clipping or snapping together, the molds are now commonly held together with magnets. And instead of a person rotating them by hand, they are placed on a machine that slowly rotates in multiple directions. Smaller, artisanal shops may have 3D molds that aren't fully enclosed when clipped together. They fill them with chocolate, let them sit for a few minutes, and then pour out the excess chocolate to leave a hollow figure. 

The production, of course, is a little different if you want to have a surprise in the centre of the hollow figure, like M&Ms or Smarties. Anyone who's made hot chocolate bombs knows this process: mold the two pieces separately, add your fillings to one side, and then attach the other half either by melting it a little on a hot pan or by "gluing" it into place with more chocolate. I've made cocoa bombs before, including some Grinch-inspired ones with a friend -- but I've never made a one-piece, hollow chocolate figure. Until now. 

This week, on chocolate night, I decided to try it. I have a few egg molds that can be combined for this purpose. I grabbed some white chocolate left over from Christmas, prepared it using the direct tempering method, and poured it into one half of the mold. With binder clips, I secured the other half and began rotating. Once I was confident the chocolate was well distributed, I let it sit for a minute and then flipped it over and let it sit for another minute. Then I tossed it in the fridge to set. Fifteen minutes later, I pulled it out and was saddened to find I couldn't unmold it. I thought perhaps I'd messed up the temper. I made the mistake of using too much force and I cracked the egg in half. Still unable to get the chocolate out, I put it in the freezer for 5 minutes and the two halves then popped out cleanly. The next day, it was clear that the chocolate had been in perfect temper, but I had been too impatient. So I tried again.

My second attempt was with leftover dark chocolate. I repeated the process, but this time when I took it out of the fridge, instead of trying to unmold it, I popped it into the freezer immediately for a quick cold "shock." And the hollow egg unmolded perfectly! Huzzah!

Pleased as punch, I set it aside on a crumpled paper towel so that it wouldn't roll around. And then I turned my attention to "fixing" the white chocolate one. I could have melted down the chocolate and molded the egg again, but instead I decided to put a surprise inside. I took the first half of the egg and smoothed the edge by melting it on a hot frying pan. Then I filled it with candy before smoothing the second half and applying that on top while the chocolate was still melted. I patched the bottom with a little melted chocolate. Voila! Done. 

I'm very excited with how these turned out and for the possibilities going forward. The only challenge I have now is that the foil I usually wrap chocolates in isn't big enough for this jumbo Easter egg. Consequently, I'm going to need a creative packaging solution. But there's plenty of time to sort that out by Easter. 


Garfield Birthday Cake

I don't think I've ever made my own birthday cake before. Somehow, that just seems wrong. But this year, I decided it would be a good excuse to try the Garfield character cake pan that I bought a year ago and blogged about last week. When I announced this plan to my boyfriend, he insisted that he should help, because I shouldn't have to make my own cake. Another C&J Creation. I was game.

Our first step was to figure out how much batter would be required to fill the pan to 2/3 full. Initially, I was thinking I might need to make more than one batch, given the depth of the pan. (Garfield is, after all, a rotund cat.) I searched online to see if Wilton had any guidance, but given the age of the pan, I didn't find anything reliable. It seems most character pans are designed to work with one cake mix, but with the shrinkflation of the past few years, that is no longer a given. We decided to fill the pan with water and then measure the water. Seven cups. A few calculations later, I determined that the recipe I intended to use should be enough to fill the pan. 

Next, we needed a pattern for the fondant that would replace the missing plastic face. First, I traced the impression on the pan so that it would be the right size and general shape. Then, looking at a picture of the vintage pan on Pinterest, I sketched in Garfield's features -- his eyes, nose, and mouth. Once we were happy with it, I made a few copies and, the following night, we made a pilgrimage to Bulk Barn to buy a cake board big enough for the Garfield cake. 

Then, over the weekend, I set about colouring the fondant. I had some yellow left from making Woodstock as part of our 2024 gingerbread "house," so I combined it with white to make it more pastel. Then I coloured a chunk of white fondant with orange. When it was looking a little neon, I added a small touch of brown to tone it down. Finally, as with the yellow, I combined some red fondant with white to achieve the pink for Garfield's nose. I cut apart my template and used it to make the various features of his face, piecing them together on a white fondant base. Then, my boyfriend used an extruder to create the black outlines that are key to Garfield's cartoon appearance. Once we were happy with the face, I placed it on top of the cake pan so that it would take the pan's shape and dry with a curve.

The next day, we made the cake. This was the strangest cake recipe I've ever made. I chose Yolanda Gampp's ultimate chocolate cake. It started with dissolving Dutch-processed cocoa powder in boiling water. Then it said to cream the butter and sugar for eight minutes. EIGHT MINUTES! I thought this was overkill, but was committed to following the recipe. It was surprising to see the butter and sugar move through so many textures during that eight minutes. I have to say, if the recipe hadn't specified eight minutes, we probably would have stopped after one thinking we'd adequately creamed the butter and sugar. Clearly, none of us are doing that correctly. Until now. I sifted flour. I cracked open eggs. We mixed, alternating between dry and wet ingredients. And eventually we had batter to fill the pan (and more besides, so I also filled a 6" round). 

Now, we had carefully prepared the pan. We greased it extremely well and even used a pastry brush to get into every nook and cranny. We were sure that we'd done an adequate job on that front. But about 90 minutes later, after the cake had baked and then cooled slightly before turning it out onto a wire rack, I discovered we had not done a good enough job. That cake did not want to come out of the pan. I ran a spatula around the edges, I tapped, I forced a flexible bench scraper between the cake and the pan, I swore, I tried the spatula again. I continued in this fashion for about 30 minutes before I finally got the cake out of the pan. And when it did finally come out, it was in two pieces. 

You win some and you lose some in this life, and I had clearly lost this round. I wrapped the cake in plastic and gave myself a timeout. After some reflection, I decided that the best way to proceed was to coat the cake in ganache to hold the cake together and smooth the crumbs. So the next day, I made a dark chocolate ganache and once it had cooled and thickened, I coated the cake before returning it to the fridge yet again.

By Wednesday, we were now a full week into the making of the cake and we were anxious to finish it. After supper, I made buttercream icing, whipping it for an ungodly amount of time. I started with the seven minutes recommended by my cake decorating instructor more than a decade ago. And then probably spent another seven minutes mixing it to incorporate the colour. I matched it as closely to the orange fondant eyelids as possible and then filled a piping bag fit with a no. 21 tip -- an open star.

My boyfriend did the first section of the cake. And then when he tired of dotting stars, I tagged in. About forty minutes later, with severe hand cramps, the cake was completely covered in orange icing. Then we once again extruded fondant and used it to outline Garfield's features and create his characteristic stripes. We admired our work and took copious photographs. And then we chopped two pieces of cake from his body.

Not to toot my own horn, but this was the most delicious birthday cake I've ever had. The cake was dark and rich, and had a very dense texture -- almost like a chocolate pound cake. The icing was very buttery. And that thin layer of ganache really kicked it up a notch. 

As for lessons learned, first I would say, don't make a character cake -- at least not with a character cake pan. You're in for a world of hurt. They are frustrating to use and I find it hard to believe anyone has success getting the cake out of the pan without any casualties. But if you are like me and just can't stop yourself from doing it, invest in the expensive cake release spray instead of typical pan preparation methods. I don't know whether that would make a difference, but I'd try that before anything else. 

Second, the hand cramps are real. Plan for breaks. Or take a tag team approach. Or at the very least keep the icing bag topped up so that you don't have to squeeze as hard when piping (and so that the heat from your hands doesn't melt the buttercream). 

And, finally, less is more. You don't need to get all of the details done to capture the essence of the character. A few well placed details will do the job. We initially intended to outline the legs and feet, but quickly realized it overwhelmed the cake. When we pared it back, the cake looked better.

All in all, a fun birthday adventure! Now I need to fly home later this month to make a Tigger cake for my sister.

AI Recipes

Artificial Intelligence (AI) is everywhere. It has slipped into our DMs on Facebook Messenger, appeared as an uninvited guest in our phones' list of apps, and infiltrated the social media platforms that once enabled us to connect with people we know and care about. AI is helping us to drive more safely, with enhanced crash detection and lane-keeping assistance. And it's annoying us on every website we visit, popping up as the helpful AI chat bot that no one requested. In all realms and sectors, it's omnipresent.

In education, everyone is grappling with this disruptive technology. It is changing everything we thought we knew about how to effectively teach students, how people learn, what skills are and will be valued in the workplace, and how to assess competency. There are some who want to ban it. Others are attempting to proactively engage with it. It's a hot topic for debate at many tables. Recently, in an effort to learn more about this pervasive technology and keep up with the pace of innovation, my colleagues and I have begun exploring the power of various tools, like ChatGPT and Copilot, to determine when and how they might be used in an ethical fashion to work smarter, not harder. 

We've had mixed results. Partly, the quality of the results depends on the quality of the prompt, so there's some learning to be done by users in that regard. AI appears to be incredibly effective at revising draft text or summarizing an extensive body of data. It also has some epic failures -- even when the prompt is highly specific. Now, admittedly, in my free time, a lot of my experiments have been revolved around making cute pictures of cartoon bears drinking coffee using Copilot. But as it executes a seemingly simple task (compared to mastering scientific literature, for example), I've been entertained to see the results and the limitations. For example, it produced a great image but misspelled the word "chocolate" as "choccolat." I asked it to fix the spelling while keeping everything else exactly the same -- and after five attempts, it still got it wrong (or fixed the spelling but changed the image). I had an abstract that was 2 words over the limit and asked it to shorten it. It told me it had done so, but then output the exact text I'd given it with no changes. Not so intelligent, now, eh?

During one of our coworking sessions recently, we started talking about how much we missed the energy bites that once appeared at every meeting. In these days of fiscal prudence, the stockpile we once had in the freezer has long since disappeared with no replenishment in sight. We wished we could get the recipe from food services, but figured there was no way they'd give it to us. I mentioned that I've looked at many recipes online, but haven't found one that is quite right. They all have been missing one or more of the ingredients we know are in them -- chia seeds, oats, chocolate chips, peanut butter, coconut. My brilliant coworker mused, "I wonder if Copilot could write us a recipe if we told it the ingredients." We temporarily put that in the metaphorical parking lot, finished the task at hand, and then rewarded ourselves with a quick Copilot prompt. In no time it produced a recipe.

Scanning the ingredients and the method, it looked like it would work. In fact, there was only one change that I would make: instead of mixing the dry ingredients first and adding the wet to them, I would mix the wet ingredients first and add the dry to them (only because peanut butter and honey can be a challenge to combine). We considered trying the recipe sometime in the future. For me, sometime was about 45 minutes later.

What can I say? I was curious. It was also a Wednesday -- and Wednesday nights are devoted to trying new things, especially in the culinary realm. To round things out, I had all of the ingredients on hand. It was meant to be.

I followed the recipe, making only one modification in procedure (mentioned above), and was impressed by what I saw. The mixture had a good consistency and the resulting bites looked a lot like the ones we had enjoyed at work in the past. The recipe was a success in the sense that it worked. But how would they taste? 

I'm happy to report that when we tried them the next day, they were delicious and a very close dupe. In my opinion, the amount of chia seeds could be reduced. My colleague observed that you can't normally taste honey when you eat the version made by food services. Upon reflection, given the cost of real honey (and maple syrup), we concluded that they probably use a cheaper sweetener, like corn syrup. We both thought that mini chocolate chips would be better. Regardless, they are "a keeper," as Trooper Ron would say. 

While this experiment worked, I'm not sure that I would necessarily recommend AI recipes to others. Presumably, Copilot and ChatGPT have trained largely on free online content (as well as books). The quality of recipes online, though, is variable (to say the least). Sure, some are delicious. But far more yield disappointing results -- in some cases, they are just okay, while others are total disasters that don't work. You're definitely taking your chances. 

But if you're trying to find an elusive recipe, it might be worth the gamble.  


Lamingtons

I'm not sure why, but the idea of making lamingtons has been in the back of my mind for a few years. I can't really explain it. I believe I saw a YouTube video of someone making them during the days of isolation in 2020. And then, of course, once you watch one lamington video, the algorithm rips the rug out from under you and you plummet down the rabbit hole. While I didn't recall eating them before, they reminded me of other desserts involving coconut that I'd seen as a child. And they certainly seemed like the sort of dessert Newfoundlanders would appreciate -- a layer of jam inside, the outside coated in coconut. In the words of Ina Garten, how bad can that be? 

When I started looking into recipes, I stumbled upon one by Barry Parsons who shares Newfoundland recipes on his Rock Recipes site. According to him, these creations were popular in Newfoundland during the 1960s and called chocolate coconut cake squares. And they weren't limited to one flavour -- raspberry and strawberry variations were common. Indeed, its the pink cake coated in coconut that I member seeing when I was young. Parsons also provides a lemon variation that sounds delicious! Decision made! Lamingtons would be this year's "cake" for a friend's upcoming birthday brunch. 

I chose to make the Cupcake Jemma recipe because I believe that's where I first saw them being made, but opted to add the jam layer that I'd seen in other variations. I started this culinary adventure on a Wednesday night, when I made the cake. First I mixed the sugar, eggs, and vanilla. Then I folded in the flour and baking powder. Finally, I add the melted butter. I poured the thick batter into an 8x8 pan lined with parchment paper and popped it into the oven for 25 minutes. Once a toothpick came out clean, I transferred the cake to a cooling rack before wrapping it well and setting it in the fridge overnight. 

The adventure continued on Thursday evening. I torted the cake using a Wilton cake leveler and filled it with seedless raspberry jam, taking care not to add so much that the layers would slide around. Then I wrapped it well and popped it back in the fridge to chill.

On Friday, I made the chocolate icing. What's that you say? More butter? Did Julia Child write this recipe? Once the icing was glossy and fluid, I cut my cake into 9 pieces and trimmed off the caramelization. I dipped each one into the icing, followed by the coconut, and placed it on a cake rack while I coated the remaining pieces. I kept three pieces coconut-free for my boyfriend (and other coconut naysayers). Then I returned them one more time to the fridge to fully set. 

Initially, I admit, I was a little concerned about serving lamingtons as birthday cake. I was primarily worried that they would be too small and look more like the squares you see at a church social. But once dipped in chocolate and coated in coconut, they looked much more substantial. The result? A delicious buttery cake with a slightly tart jam layer in the centre, surrounded by super sweet icing balanced by a coating of unsweetened coconut. The cake was more dense than I'd anticipated (I'd been expecting more of a sponge cake), but that may be a result of the particular recipe I chose. 

As for the leftover chocolate icing, it made the perfect base for a decadent hot cocoa!

See you next week!

Fare Thee Well, Cherry Blossoms

About a week ago, a bombshell headline shook Canadians from coast to coast. Hershey Canada confirmed that it would no longer produce Cherry Blossoms. For some, the realization set off a period of mourning, for others it led to hoarding. In the days that followed, the Cape Breton Post's cover story featured a fellow who purchased 30+ because of the personal meaning they hold for him. The power of food and memory is remarkably strong.

As for me, I probably have had one or two of these in my lifetime and primarily associate them with my mother who had them periodically (perhaps at Christmas). They aren't a deeply nostalgic item for me (unlike my beloved Maple Buds, which I pray one day will return). Still, it seemed only right that I would attempt to track down a few before they disappeared forever (or were picked up by a niche producer and showed up in retro candy shops for a premium). 

On a Friday night grocery trip, I kept my eyes peeled for for the iconic yellow box. Walmart failed me. And when I went to Sobeys, I found empty cases where they had once been displayed. Clearly, I wasn't the only person looking for them. I contemplated going to a nearby corner store that might have them, but then noticed that several of the check-out lanes were closed and blocked by displays. What if there were some saved from the hoarders by being inadvertently hidden from sight? I strolled toward the closed lanes and peered behind the racks of potato chips. There, on the bottom shelf of a display was an untouched case. I did what any self-respecting chocolate blogger would do -- I got down on the floor and retrieved four.

The box seemed smaller than I remembered. When that happens, I'm never sure if it's because the item really is smaller or if it's a trick of memory that things always seemed bigger when you were a kid.  I also remembered it being a perfect cube, but that wasn't the case (faulty memory or shrinkflation?). Either way, I had a bit of sticker shock when they rang up at $2.29 each. As the international student totalled my order, I wondered how many Cherry Blossoms he had checked in that day and whether he was confused by the sudden popularity of an unusual item. The thought passed as I completed the transaction and I left the store wearing a triumphant Cheshire grin.

A few days later, I decided it was time to crack one open. I removed the foil-wrapped confection from its box and examined its size and shape before biting in. The chocolate, which is particularly thick with peanut and coconut inclusions, was rock-solid and not easy to bite into. (I had been warned by a friend that she knew someone who broke their false teeth on one.) Carefully, I persevered, anticipating the reward of a gooey centre, but nothing happened. No liquid fondant oozing out. Just a thick, white paste-like centre. I took a second bite and found a piece of cherry, but the experience definitely wasn't as advertized on the box. Maybe it was "too fresh" and the invertase hadn't yet liquified the centre (invertase is an enzyme that, over time, breaks sugar into its component parts of glucose and fructose). Maybe the recipe for that batch had failed. Maybe the recipe had changed through the years. Whatever the issue, I had a dud. 

While I enjoyed the coconut in the milk chocolate shell, both for its flavour and textures, I wasn't particularly impressed by the Cherry Blossom's flavour overall. That's not entirely surprising, of course, given the changes to commercial chocolate as a result of the creeping costs of ingredients and spiking costs of chocolate. If you read the ingredient list, you won't see cocoa butter. It's just cheap (read: fake) chocolate. The mass-produced cousin of the cherry cordial. 

When I posted a photo of the Cherry Blossom on Facebook, one individual commented that they were sure I could make one that was better. About a year after completing my professional chocolatier program, I actually did make cherry cordials for my mother. While they are typically made with fondant containing invertase, I found an alternative production method demonstrated by Steve Andrianos of Hercules Candy. Intrigued, I had to try it. One evening, seated at my dining room table, I coated sour cherries (instead of maraschino) in powdered sugar mixed with cherry juice, rolling them in layer after layer until they had built up to the right size and texture. Then I dipped them in dark chocolate by hand. Ten days later, when I cut into one, the centre had magically liquified. 

Believe me when I say that the dark chocolate sour cherry cordial is the classic's sophisticated older sister who spent the summer in Europe. If I ever open a chocolate shop, it will be on the menu. Obviously, the Cherry Blossom doesn't hold a candle to it -- but that would be an unfair match up anyway. Mass-produced chocolate is in a different weight class than small-batch. 

Nevertheless, like any object, it can be imbued with meaning and serve as a powerful vehicle for memory. 

To read about other nostalgic confections, check out my blog on malted graham sandwich bars or the 4 Flavors bar

Viral Chocolate

As someone who doesn't use TikTok (simply because I already have too many social media platforms to follow), I often find myself late to the party when it comes to viral food and beverages. The Dalgona coffee of the pandemic, the baked feta pasta that followed, the devilled egg flights more recently -- I eventually heard about them (and tried a few), but sometimes more than a year after the trend peaked. So, it shouldn't be surprising that it took a few months for the viral "Dubai chocolate bar" to come onto my radar. 

Actually called "Can’t Get Knafeh Of It," this thick bar filled with pistachio cream, tahini, and toasted kataifi originated at FIX Dessert Chocolatier in Dubai. Why it went viral over thousands of other bars in the world is anyone's guess. Yes, it was beautifully produced. It was also expensive. And the exclusivity factor -- at the time they were only available in Dubai and Abu Dhabi -- had its own exotic allure. Content creators who couldn't get their hands on one turned to making their own versions. One blogger noted that the DIY version became so popular that it caused a "nationwide pistachio cream shortage" (but didn't offer any proof of that claim). Curiosity sparked! 

No, I didn't make one myself. That would be too much of a commitment, even for me. I'd have to track down a Middle Eastern ingredient called kataifi that is similar to shredded phyllo pastry. I also didn't buy the original "Can't Get Knafeh Of It." It has been imported by shops in the United States (and perhaps in Canada), but it's still not particularly easy or quick to get. So, instead I bought a copycat bar that was imported from Istanbul, not Constantinople (if you know, you know). 

The bar arrived in a rather posh black box with gold foiling. Surprisingly, the chocolate was in perfect temper, with no evidence of bloom, despite its journey. Inside, as anticipated, was the crunchy kataifi filling with its characteristic green colour from the pistachio. Unlike many of the content creators online, I did not break the bar in half with my hands or crush it to make the filling ooze out. Instead, I used a hot knife to slice through it. Hopefully you appreciate the clean cut as much as I do. 

The flavour, I'm sorry to say, was unremarkable. The milk chocolate was smooth and not overly sweet. The filling had little flavour, which was unexpected. It would have benefitted from some something -- anything! -- that would have enhanced the flavour (more salt or sugar or tahini). The real appeal, however, was in the texture and the sound of the bar while biting through the layers. (Sorry, no ASMR video to share.) The crunch factor was off the charts and was the perfect foil to the smooth chocolate -- and that rather than the flavour is what made it moreish. Perhaps that is also why it went viral.   

Was it worth trying this bar? I suppose so. Would I go out of my way (or pocketbook) to have one again? Probably not. But if I'm out and about and happen to stumble upon kataifi, then perhaps I'll purchase it and try to make my own version in an effort to make a better bar. 

Until then, I hope your new year is off to a sweet start!

Chocolate-Coated Ice Cream Bars

For Christmas, I received the book Chocolate Recipes and Techniques from the Ferrandi School of Culinary Arts and as part of my chocolate study, I read many of the recipes. While I gained inspiration from in terms of flavour and texture combinations (and will surely return to them in the future), what stood out was the section on frozen desserts. Maybe it's because I'm dreaming of summer, maybe it's because it was different from the other books I've read. Either way, I decided my next foray would be chocolate-coated ice cream bars. 

Now, last week, I blogged about making strawberry ice cream with chocolate fudge brownie pieces. For several years, I've been making a quart of ice cream to enjoy during the summer. Knowing I wanted to try making ice cream bars, I had already ordered a mold from an online retailer. I put the mold to good use, filling four of the eight wells with ice cream before transferring the rest of the mixture into reusable ice cream tubs. (I cut the mold in half to make it easier to work with.) I let these set in the freezer until I had time to coat them in chocolate. On Wednesday evening, despite a long day at work with too many hours on my feet, I decided to carpe the ol' diem and get this done.

Since I had only four ice cream bars and the recipe said it would coat ten, I made half the recipe. It couldn't be simpler. Melt dark chocolate to 40 degrees and then add grapeseed oil. Stir well and dip.

I dipped the first two bars, but found it tricky to get them fully coated because of the vessel I was using to hold the chocolate. For the second two bars, I spooned the chocolate over the ice cream bars. Both methods worked fine provided I took a one-and-done approach. If I tried to re-dip or fill in missed spots, I ended up with a rippled coating. If I were to do this again, I'd make double the required coating, giving myself more to work with.

Once the bars were enrobed, I popped them back into the freezer for 20 minutes to fully solidify. And then I packaged them individually, to be enjoyed on a hot summer day. (Or on a Friday treat day...)

What can I say? They look good. They taste great. 

The viscosity of the chocolate was such that it produced the perfect chocolate shell -- not too thick, not too thin, and perfectly capable of containing ice cream as it begins to soften and melt. And the addition of the grapeseed oil made it easy to bite through the shell, directly out of the freezer. Top marks to the Ferrandi School of Culinary Arts.

Look out, Haagan Dazs, I'm coming for you!  

Fruit & Nut Bars

After a brief break from my chocolate study, in pursuit of other kitchen adventures (like Oven Porcupines and Cranberry Orange Muffins), I decided it was time to get back to it. This week's endeavour: transform the remains of a delicious milk chocolate Easter bunny.

Now, you may be wondering why one would want to transform an Easter bunny instead of just eating the Easter bunny. That's a fair question. The bunny was mostly solid and quite thick, so biting into it felt like it might damage the teeth. Instead, I found myself attacking it in rather gruesome fashion to chop it into more manageable pieces. I decided the best thing to do would be to melt it down and turn it into something else, like chocolate bark. And that's when I started thinking about some inclusions I had on hand in my chocolate stash. 

Over the years, I've experimented with a variety of freeze-dried fruits and berries. Most commonly, I've ground them into a powder and used them to create truffles and other chocolates, but I've always wondered what they would be like used whole or chopped into pieces. Would the texture be too dry and unpleasant? Would it be chewy or sticky? Could it be used to create a naked chocolate bar in the same way that dried fruit is? There was only one way to find out. 

I took a knife to the bunny and chopped it into small pieces. The milk chocolate chunks weighed 130g. Now, that's a very small amount of chocolate to work with and almost impossible to temper, but I decided not to add callets because I didn't want to waste ingredients if the experiment failed. With the chocolate prepared using the direct tempering method, I added about 8g of freeze dried blueberries and about 15g of chopped walnuts. I stirred them in and then poured the chocolate to a silicone bar mold. I had enough to make four small bars. I popped them into the fridge for 15 minutes and once they were set, I unmolded them. 

The result? Four tasty chocolate bars. While they have some of the characteristic shine of well-tempered chocolate, they also have a bit of a mottled finish as a result of using a silicone mold that can't be polished in the same way that polycarbonate molds can. Since these are a test, that doesn't bother me. The focus of this week's experiment, after all, is texture. 

I'm quite surprised to report that the freeze dried fruit is delicious in this application. As hard as it is to believe, I wasn't really able to tell that the blueberries were freeze dried. They had a bit of a chew, but not unpleasant, and they weren't dry or chalky at all. My fear that they would be unpalatable was unfounded.  

Fruit and nut is a classic combination. And using freeze dried fruit and berries is definitely worthy of further experimentation, particularly in chocolate bark. 

What fruit and nut combo would you like to see? 

Dulce de Leche Espresso Hearts

During the reorganization of my chocolate supplies a few weeks ago, I found a heart mold that I had purchased during my professional chocolatier program but never used. With Valentine's Day quickly approaching, it seemed like an ideal opportunity to test it out. And then after reading through ganache recipes one Tuesday night, I was inspired to try making a milk chocolate heart filled with dulce de leche and espresso ganache.

I chose milk chocolate for a few reasons. First, I have a lot of it because I primarily use dark chocolate in my production. Second, because I gravitate toward dark chocolate, I don't have enough experience tempering milk chocolate. As well, I haven't employed the piping bag method of shelling chocolates using milk chocolate. Guaranteed to be more tricky than dark chocolate, I wanted to try it. And practice does make perfect, right?  

These dulce de leche espresso hearts were a multi-step process: decorating the mold, shelling, piping the dulce de leche layer, piping the ganache layer, capping, and packaging. I spread these out over two weeks partly to make it more manageable and partly because I didn't realize how close February was and didn't buy cream with my groceries (and after 16 hours of writing spread over two days, I just didn't have it in me to run out to the store). 

Session One: Decorating and Shelling

I began by tempering some coloured cocoa butter to decorate the mold. Now, I just have to say that I was thrilled to finally try this again, since I hadn't done it in years. I purchased gold Roxy & Rich cocoa butter back in December when I replenished my dark chocolate supply. I've wanted it since 2018. And now it is mine! (My precious...)

Tempering coloured cocoa butter is easy. It just requires patience. You remove the cap from the bottle and pop it in the microwave for 10 seconds, then remove it and shake. Then another 10 seconds, remove, shake. And another 10 seconds, remove, shaky-shake. You get the picture. You progress in this fashion for about 1 minute and thirty seconds and eventually some of the cocoa butter melts while some of it remains solid. And by shaking, you ensure the temper of the cocoa butter. 

I dispensed a small amount into a pinch bowl, rolled a latex cot over my finger (thank you Shoppers Drug Mart), and then finger painted the molds. I decided to swipe only once from top right to bottom left, and in less than a minute I was done. The encouraging part of it all was that the gold cocoa butter began to solidify almost immediately, so I knew it was in temper. 

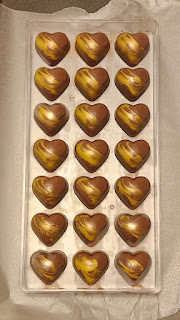
Next, I tempered 350 grams of milk chocolate and filled a piping bag. Using the "human depositor machine" method, I filled each heart, tapped the mold to remove air bubbles, and then inverted the mold to let the excess chocolate drain out onto a piece of waxed paper. Then I placed the mold on a tray in the fridge for 10 minutes. Now, I didn't quite get all of the air bubbles out and the shells are a bit thick in spots, but I was happy with the results nevertheless. It's a much cleaner way of working and in the future if my chocolate is just a little warmer and I tap it a little longer, I think I can solve the issue of it setting too quickly. (Yes, this means there will be more milk chocolate bonbons molded in the future.)

At this point, I set the shelled mold aside to await the next steps. 

Session Two: Layering Dulce de Leche and Espresso Ganache

The second production session occurred on a Sunday morning, passing the time during snowmageddon. I started by making a small batch of milk chocolate espresso ganache, so that it could cool while I was piping the dulce de leche layer. I measured heavy cream, butter, espresso powder, and milk chocolate into a bowl and went the old-fashioned bain marie route to melt it all together. About 10 minutes later, I had a beautiful ganache. I removed it from the heat to cool. 

Next, I poured my dulce de leche into a piping bag. With right hand applying pressure by squeezing the bag and left hand controlling the flow by pinching about a half inch above the opening, I very slowly deposited a small amount of dulce de leche into each heart. The dulce de leche was very fluid and shouldn't set while inside the chocolate, so the hearts should ooze when bitten into. 

Then I checked the temperature of the ganache. While it was starting to set, it was still 37 degrees -- far too hot to pipe into the mold because it could take the shell out of temper. I gave it a good stir and left it for ten minutes. Still too warm when I checked it, I left it for another fifteen minutes. When I returned, it was at 27 degrees, so I knew it was safe to pipe. 

Using the same method as for the dulce de leche, I quickly piped the ganache over the first layer. This part was tricky. To avoid the heavier ganache sinking through the dulce de leche and creating a total mess, I had to pipe at an angle across the surface of the dulce de leche faster than it could ooze upwards. For the most part, it appears to have worked well. With a toothpick, I knocked down any ganache peaks that were high enough to impede capping. Then I left the ganache to fully crystallize on top of the dulce de leche. 

Session Three: Capping

Still snowed in, the third session occurred early on a Tuesday morning. I gathered my supplies (chocolate, a silicone bowl, a piece of acetate, and a drywall knife), and prepared myself for capping. It can be tricky business and it's critical for shelf-life.

First I tempered a small amount of milk chocolate (but also about 4x more than I needed). After two temper tests to ensure it really was going to set properly, I spooned three lines of chocolate onto my mold -- one at the top of the mold, one along the second row of hearts, and one about half-way down the mold. Then I lined up the edge of the acetate with the edge of the mold and scraped across the full mold with the drywall knife. I've tried this method several times, but this was the first time that I got the right amount of chocolate on the mold. After admiring my work for a brief second, I cleaned up the edges (and snapped a photo) and put the mold into the fridge for 13 minutes.

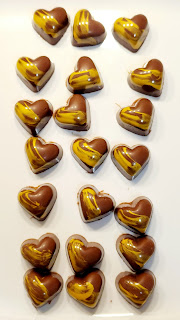
Next, I inverted the mold onto a tray and lifted it to see if any would fall out on their own. None did. In the past, I have tapped the edge of the mold on the counter to release the chocolates, but inevitably a few (or many) would come out cracked as a result (I guess I was probably tapping with too much force). So, instead, this time I tapped the mold with a wooden spoon, as I had seen in an Instagram reel by Kate Weiser Chocolate. Sure enough, one by one, the hearts dropped cleanly from the mold. And when I moved aside the mold and spoon to assess my work, I was absolutely thrilled. The shine on the chocolates was incredible. 

Session Four: Packaging

A few days after finishing these hearts, I checked my stash of packaging and confirmed what I already knew: I didn't have anything suitable for single chocolates. I have a large quantity of 2-piece and 4-piece boxes, as well as a variety of cellophane and paper bags. Alas, nothing for one piece. It was time to get crafty.

And so I went onto the Silhouette Design Store to look at cut files for boxes. Eventually I found a simple triangular box that should work. I downloaded it and began manipulating it to get the right size and fit as many on a single piece of cardstock as possible. After a few tests, I cut one dozen boxes and assembled them.

I popped each chocolate into a mini cupcake liner (so that the chocolate wouldn't come into contact with the cardstock that I used) and then carefully slid one into each box. I folded down the flaps and closed the boxes with heart stickers. Then I put them in an airtight container to await their delivery. 

Final Thoughts

As I finish writing this blog, I haven't tried one of my dulce de leche espresso hearts yet. I've tried all of the components, but I won't know how they work together for certain until sometime next week when I permit myself to indulge. But I can say that I'm very pleased with how they came together. The design is precisely what I envisioned, the milk chocolate is in perfect temper, and thanks to new production techniques the work was more controlled and cleaner. And this is the first time ever that I've had all pieces completed in sellable condition - no major bubbles, no marred finishes, no cracks, and no bloom. 

In short, I'm thrilled.

Happy Valentine's Day or Galentine's Day or Whatevertine's Day! 

Any excuse to eat chocolate, am I right?


Discounted Chocolate

How many of you wait until the day after Valentine's Day or Halloween (or any holiday for that matter) to buy discounted chocolate? Maybe you go for a box of Turtles, or a bag of Lindt truffles, or the can of Quality Street that you couldn't afford before Christmas. Almost always, it's industrial chocolate that you're buying. And to be clear, there's no judgement here. Industrial chocolate is delicious. (I'm looking at you, Reese peanut butter cups.) It's not normally ethically sourced, single origin chocolate made by a small business.

So you can imagine my surprise last weekend while strolling through the clearance section of Michaels (of all places!) when I saw a small box of chocolates that was now 70% off. I noticed that the label referred to "farm to bar chocolate" and thought it interesting. The brand, Truffle Pig, sounded vaguely familiar, but I couldn't place it. After confirming the price of a mere $2.10 at a self-serve scanner, I decided whatever they were, they were worth it. 

I have to admit, I was a little confused to have found this chocolate at Michaels. I spend a fair amount of time browsing there. I'm familiar with the horribly overpriced industrial chocolate and other snacks near the cash registers. Despite being at Michaels several times before Christmas, I don't recall having seen these anywhere in the store. Their sudden appearance after Christmas is a bit of a mystery to me. In any event...

Truffle Pig Chocolate is based in British Columbia. A woman-owned business, it is focussed on ethical chocolate that is sourced in fair and sustainable ways. A box of five truffles (aka piglets) can be purchased from their website for $6.00 and chocolate bars start at $3.75 each. These are already reasonable prices!

One of the things we liked about them immediately was that each truffle is individually wrapped. Now, admittedly, this does increase the amount of packaging (and is the type of wrapper that can't easily be recycled) and so is less sustainable from that perspective. But it does ensure the freshness of each piece when eaten over a longer period of time.

Ok, let's be honest, you can easily eat this box in one sitting, but as I write this I'm proud to report that four days later, there are two piglets left. (No promises on how much longer they will survive...)

The colourful packaging is appealing and clearly identifies the various flavours. And it features their very recognizable, happy pigs. (Why pigs, you ask? Because pigs are known to be truffle hunters -- the fungus variety, not the chocolate.)

Made with single origin chocolate from Nicaragua (you can meet the farmers here), these truffles are delicious. When I've tried other single-origin chocolate, I've often been surprised by the fruity or floral notes, but these, to me, had more of an earthy undertone. The chocolate is smooth and has just the right amount of sweetness. The peanut butter and hazelnut centres were beautifully balanced and the piglets were, quite frankly, cute.  

So, here's to discounted ethical chocolate and discovering it in unexpected places! And if you have the opportunity to purchase Truffle Pig Chocolate in the future, regardless of the price, it's entirely worth every penny. 


Repairing Ganache

Some of you may recall that last year I had a rather epic fail in my kitchen, when I made an orange white chocolate ganache to fill Easter eggs. I was baffled by it at the time and none of the salvage tips I could find online actually worked well enough for me to use it as planned. This week while continuing my chocolate reading, I found the explanation for what occurred and, more importantly, how to fix this issue in the future. 

According to Greweling, "A ganache that requires the addition of liquid to re-emulsify it is too high in fat. Its formula should therefore be adjusted for future batches" (Chocolates and Confections, p. 95). Now that I think about it, the white chocolate ganache I made, flavoured with orange oil and made with butter in addition to cream, definitely had a higher fat content than is the norm. Adding more cream and more melted white chocolate did nothing to fix the issue because those additions didn't improve the ratio of fat to water. Had I added milk or even water, I might have had a different result and more success in repairing the broken ganache. And when I remade the ganache the following day, I essentially did reformulate the recipe, because I used less butter and more cream, which in turn altered the ratio of fat to water. Heavy cream has a fat content of about 35%, while butter has a fat content of about 80%.  

The idea that a ganache could have too much fat has never been on my radar. Too much water, sure -- that would shorten the shelf-life. But too much fat? 

Usually when we talk about ganache, we talk about ratios of chocolate to cream (or whatever else is being used to soften the chocolate). Milk chocolate requires half as much cream as dark chocolate to achieve the desired effect and white chocolate requires half as much cream as milk chocolate. So the ratios we were taught really weren't expressed in terms of fat content, but in terms of the type of chocolate. When making ganache, it's not uncommon to substitute alcohol, butter, or even water for some or all of the cream, complicating things further. And while I've noticed that alcohol in a ganache causes it to behave differently, I simply attributed it to some characteristic of the alcohol and not specifically a change in the fat to water ratio. 

Once you deviate from a traditional ganache recipe, it seems, you have to pay attention to the fat to water ratio. Lesson learned. 

I also learned another interesting tidbit during this week's reading. Not enough to warrant a blog post, but fascinating nevertheless. I already knew that starch molding is a common method of making fondant, jelly, and cordial centres that are later enrobed in chocolate. I was first introduced to this confectionary technique while watching the YouTube videos of Hercules Candy. You press shapes into cornstarch (or another starch mixture), deposit liquid centres into the wells, leave them to crystallize, and then remove them from the starch mold to be covered in chocolate. But did you know that starch is flammable‽ (Yes, I just used an interrobang. It seems appropriate in this context.) Greweling cautions, "Should a large quantity of [starch] become airborne and be exposed to an open flame, the result could be a flash fire or explosion" (p. 90). 

While I'm all for experiential learning, I'm happy to acquire this knowledge by reading instead!


Chocolate Intentions

It's that time of year again when many people reflect on the past year and make resolutions for the next. Personally, I stopped making resolutions several years ago for a few reasons. First, too often we associate resolutions with deprivation -- some of the most common involve eating less or giving up particular "vices." Second, while today no doubt marks the end of one year and the start of the next, I've always felt that Spring, with trees and flowers coming alive and the return of birds and squirrels, as well as September, with the excitement of the new academic year, were just as important (perhaps more important) periods of renewal. Finally, let's be honest, without a plan, resolutions are destined to fail. 

And so for the last few years, instead of making resolutions, I make a list of things I want to do or accomplish in the next year. Instead of resolving to do less of something, I make a list of intentions that are about doing more. Sure, my list from time to time has included eating more vegetables or moving more. But one year I decided to eat more cheese and let me tell you that I had a great year selecting a different cheese each week to add to my lunch bag. Sure, people laughed when resolutions came up in conversation and I revealed that I was planning to eat more cheese, but I'm willing to bet I was far more successful in my endeavour than they were in giving up sugar! (Incidentally, if you haven't tried Coeur de Lion mini soft cheese, you're missing out.)

Since I enjoy baking and cooking, my list of intentions invariably includes a few recipes that I want to try. Often these are more time-intensive or complicated recipes, like Julia Child's boeuf bourguignon. But sometimes they are simple, like Cincinnati chili. (I recommend both.) My list also includes crafts I'd like to make. Last year, this meant M&M Christmas ornaments were on the list -- and I was particularly pleased with how they turned out!

Of course, as those of you reading this blog know, I also started 2023 wanting to spend more time on chocolate, to advance my skills and try new recipes and methods -- and, as a result, I think this year's chocolate assortment was my best work yet. That didn't happen by accident, but by plan. I supported my intention by setting aside time in my schedule. Tuesday evening became "chocolate night." I made this intention known to family and friends. I decided that I would use this blog as a way to hold myself accountable. And when necessary, I purchased the tools and ingredients to advance my practice (a chocolate stencil, citric acid, artisanal chocolate). Consequently, it's been a great year. I enjoyed my quiet evenings of study, I can see improvement in my work, and I feel a sense of accomplishment. Many in my circle have been very encouraging and supportive of this endeavour, and I appreciate that more than words or gifts of chocolate could say. 

And so what's next? 

There's no question that my intention of "more chocolate" will remain for 2024. In fact, I've already replenished my dark chocolate stash and purchased an ingredient I've been wanting to try for five years! While I still expect to observe "chocolate night" weekly, it may become a little less rigid to accommodate other intentions, like making "Basque burnt cheesecake" that I saw on Crime Scene Kitchen (though I suppose I could make a chocolate sauce to drizzle over it and maintain the chocolate connection!). I'd like to bake bread more often as well, since there really is no comparison between homemade bread and store bought. I'm thinking that Soup January may be a good opportunity. (Incidentally, Soup January started a few years ago as an intention to eat more vegetables after the excess of the holiday season, but has become a tradition that I look forward to every year.) 

I have also decided that 2024 is the year that I will learn to service my sewing machine. I've had it since I was about 14 years old and it's never been properly cleaned or oiled. I'm determined to acquire this skill and show my sewing machine the love it deserves, if only motivated by the fact that a basic service costs in excess of $100 now (!). In the spirit of setting myself up for success in this regard, I've located and saved a video tutorial on YouTube, brought my grandmother's vintage Singer oil applicator back from Newfoundland, and ordered a bottle of sewing machine oil which should arrive by Old Christmas Day. Wish me luck! 

As for this blog, I hope it will continue and that you'll indulge me when the topic strays from chocolate to other endeavours. 

I'd love to hear what your intentions are for 2024. Until then...

Best wishes for the New Year!

Christmas "Crack"

How many of you make Christmas "Crack" at this time of year? 

Most commonly it's made with a layer of saltine crackers covered in caramel (or toffee) and topped with chocolate. A number of variations exist, employing Ritz crackers, pretzels, or graham crackers as the base. Some people add sprinkles or chopped nuts to the chocolate layer, while others drizzle with white chocolate to decorate. Regardless, the end result delights the senses: sweet and salty, crunchy and creamy. It's very more-ish. 

My sister and I have made this a few times now, after finding a recipe on Pinterest. We've had mixed results. The first year, the caramel was more firm, but the second year it was very soft, sticky, and gooey. Both years, the treat had to be kept in the fridge to ensure the chocolate was set. 

As a chocolatier, I find the recipe to be infuriating, since it isn't written to promote success. It doesn't give the temperature to which the sugar should be cooked, and the method of applying the chocolate ensures it will not be in temper (and therefore will not properly solidify without refrigeration). And if refrigeration is necessary to keep the chocolate firm, then the caramel layer will get stickier and stickier, as the sugar (which is hygroscopic) attracts and absorbs moisture from the fridge. 

Now, maybe that's ok. Maybe people want more of a soft caramel than a toffee atop the crackers. Maybe people like the stretchy, sticky "caramel" layer? (My mother said she prefers it this way.) Maybe chocolate melting on your fingers as you break it apart is ok? (It's certainly tasty.) But if that's not what you're looking for, then read on!

There are so many recipes floating around the internet that it can be difficult to know which ones are good and which ones won't turn out. When it comes to Christmas "Crack," if it doesn't require you to have a candy thermometre (or tell you how test which cooked sugar stage you've reached), then you have to accept that the result will be hit or miss. This is basic science. The temperature to which sugar is cooked will determine its crystal structure -- the higher the temperature, the more firm it becomes. Cook it to soft ball and you've got a soft caramel or fudge texture, firm ball and you've got something more like a firm caramel or nougat. To achieve a snappy toffee or brittle texture, the sugar has to be cooked to hard crack -- and that can't be reached by boiling the sugar for only 30 seconds as our recipe indicated, nay, warned us not to surpass. (I admit, I ignored this warning and let it boil a few minutes longer than recommended, though I resisted the urge to break out a thermometre.) All to say, before you make your crack, it's worth considering whether you'd prefer a chewy caramel or crunchy toffee texture, and look for a recipe that supports that goal. 

Regarding the chocolate, some recipes tell you to sprinkle the chocolate over the top of the hot pan when it comes out of oven, while others tell you to melt it in the microwave and then spread it over the top. In either scenario, if you're using real chocolate, it will come out of temper (even if you melted it the right way to maintain temper), because the temperature is just too high. It will require refrigeration to solidify and it will likely experience bloom. You could let the crackers and cooked sugar cool for a few minutes before adding the chocolate (which is what we did), and as long as the chocolate was melted in a way that maintained its temper, then it will solidify at room temperature within about 5 minutes. (The way to do this is to melt the chocolate in the microwave in short bursts at 50% power (20-30 seconds each, stirring each time), stopping while there are still pieces of chocolate remaining, and letting the residual heat melt out those remaining pieces while stirring.) You'll have chocolate that doesn't melt when touched, can be kept at room temperature, and has a sheen to it (if that's your goal). Thus, before making your crack, it's worth considering whether you'd rather store it at room temperature or if you have room in your fridge to keep it, and proceed accordingly. 

It's worth pointing out that putting tempered chocolate atop toffee isn't without its own challenges. Sometimes the chocolate will separate from the toffee layer (I've experienced this after making almond roca). As a result, some chocolatiers choose to top toffee with melted chocolate (not tempered) because it will adhere better, but then sprinkle nuts over the top to hide the inevitable bloom that appears. There's no right or wrong here -- it's a choice to be made. And no one will fault you for more sprinkles or nuts!

All this said, the most important decision, in my opinion, is whether to make it or not, because, despite this blog post, if you choose to make Christmas "Crack" you really can't go wrong. Whether the toffee is chewy or brittle, whether the chocolate is tempered or not, the end result is delicious -- nay, addictive.

Tell me, have you tried making Christmas "Crack"? How did it turn out? 

Happy holidays everyone!