Showing posts with label Christmas. Show all posts

Reopening the Chocolate Factory

It's that time of year again! After a six-month hiatus, this week I dusted off my tools and molds and began work on this year's assortment. 

The planning for the assortment began about two weeks ago, when I wrote a shortlist of possible flavour combinations. Having kept notes on inspiration throughout the year, it was easy for me to pull together eight options. More challenging was whittling that list down to four. As I've written before, my goal in preparing any assortment is to achieve a variety of flavours, textures, types of chocolate, and techniques. This means in practical terms that even though I may really want to make a particular item, I won't if it doesn't work in the context of the assortment. (For example, I wouldn't do two truffles in a four-piece box.) The keeping limit for each piece is also a factor. The pieces that have longer keeping limits -- like caramels and solid pieces -- can be produced in November, while those with shorter keeping limits -- like truffles -- aren't produced until early December to ensure freshness and safety. I usually aim to produce four different pieces in four weeks or less. 

Armed with my plan (to be revealed next month) and a vague idea for which would be molded and which would be hand rolled or dipped, about a week ago I went in search of appropriate molds. This task was complicated by the fact that I recently moved and all of my chocolatiering tools and materials  are still in files boxes. I removed the lids and quickly scanned through them, plucking one mold out of my collection. I also made a mental note that as a winter project, I will need to sort, organize, and inventory my molds before transferring them into a more permanent storage solution. 

Next I checked on my packaging and, in particular, the stickers I use to close boxes. Finding only one sheet remaining, I placed an order with Vistaprint to ensure I had enough, not yet knowing how many boxes I would target for production this year. (Unfortunately, when the new stickers arrived the quality was poor, so I had to reorder them. Fingers crossed the next set will be better!)

As for how many boxes I'll make this year, I haven't yet decided. For the last two years, I've increased my production with the intent of selling a few boxes. Both times, my plans were foiled -- first when poor weather led to a sudden change in travel plans and second when a postal strike shut down affordable shipping options. One does wonder if the universe is trying to tell me something. 🤔 For now, I will probably just make enough to give as gifts. 

My next task was to order chocolate. Now, I already have white, milk, and dark chocolate on hand thanks to a strategic purchase at the end of last year (made knowing the price of chocolate was going to rise again). But with a plan to riff on Greweling's Madagascar marbles as this year's truffle, I was going to require one more chocolate type. His recipe calls for dark chocolate and white chocolate ganache piped one on top of the other and I had the idea to use dark chocolate and either gold or ruby chocolate. Unfortunately, after checking all of my usual suppliers -- and a few new ones -- I came to the conclusion that I would have to rethink my plan. Callebaut's Ruby callets are currently retailing for $80/kg! The prices for Callebaut Gold aren't much better. As much as I would love to work with one of these, it doesn't seem like the right time or the right project given the cost. 

And so I went back to the drawing board and ultimately changed the truffle to a new flavour and technique. While reviewing how the four flavours would present together, I also decided to change one of the molds I had intended to use. With all of this firmly set in stone, I was able to prepare a production schedule and make a shopping list. 

And that means that, as of the date of this blog post, the chocolate factory has reopened for 2025.  


Note: Factory image produced with the assistance of Copilot.


Christmas "Crack"

How many of you make Christmas "Crack" at this time of year? 

Most commonly it's made with a layer of saltine crackers covered in caramel (or toffee) and topped with chocolate. A number of variations exist, employing Ritz crackers, pretzels, or graham crackers as the base. Some people add sprinkles or chopped nuts to the chocolate layer, while others drizzle with white chocolate to decorate. Regardless, the end result delights the senses: sweet and salty, crunchy and creamy. It's very more-ish. 

My sister and I have made this a few times now, after finding a recipe on Pinterest. We've had mixed results. The first year, the caramel was more firm, but the second year it was very soft, sticky, and gooey. Both years, the treat had to be kept in the fridge to ensure the chocolate was set. 

As a chocolatier, I find the recipe to be infuriating, since it isn't written to promote success. It doesn't give the temperature to which the sugar should be cooked, and the method of applying the chocolate ensures it will not be in temper (and therefore will not properly solidify without refrigeration). And if refrigeration is necessary to keep the chocolate firm, then the caramel layer will get stickier and stickier, as the sugar (which is hygroscopic) attracts and absorbs moisture from the fridge. 

Now, maybe that's ok. Maybe people want more of a soft caramel than a toffee atop the crackers. Maybe people like the stretchy, sticky "caramel" layer? (My mother said she prefers it this way.) Maybe chocolate melting on your fingers as you break it apart is ok? (It's certainly tasty.) But if that's not what you're looking for, then read on!

There are so many recipes floating around the internet that it can be difficult to know which ones are good and which ones won't turn out. When it comes to Christmas "Crack," if it doesn't require you to have a candy thermometre (or tell you how test which cooked sugar stage you've reached), then you have to accept that the result will be hit or miss. This is basic science. The temperature to which sugar is cooked will determine its crystal structure -- the higher the temperature, the more firm it becomes. Cook it to soft ball and you've got a soft caramel or fudge texture, firm ball and you've got something more like a firm caramel or nougat. To achieve a snappy toffee or brittle texture, the sugar has to be cooked to hard crack -- and that can't be reached by boiling the sugar for only 30 seconds as our recipe indicated, nay, warned us not to surpass. (I admit, I ignored this warning and let it boil a few minutes longer than recommended, though I resisted the urge to break out a thermometre.) All to say, before you make your crack, it's worth considering whether you'd prefer a chewy caramel or crunchy toffee texture, and look for a recipe that supports that goal. 

Regarding the chocolate, some recipes tell you to sprinkle the chocolate over the top of the hot pan when it comes out of oven, while others tell you to melt it in the microwave and then spread it over the top. In either scenario, if you're using real chocolate, it will come out of temper (even if you melted it the right way to maintain temper), because the temperature is just too high. It will require refrigeration to solidify and it will likely experience bloom. You could let the crackers and cooked sugar cool for a few minutes before adding the chocolate (which is what we did), and as long as the chocolate was melted in a way that maintained its temper, then it will solidify at room temperature within about 5 minutes. (The way to do this is to melt the chocolate in the microwave in short bursts at 50% power (20-30 seconds each, stirring each time), stopping while there are still pieces of chocolate remaining, and letting the residual heat melt out those remaining pieces while stirring.) You'll have chocolate that doesn't melt when touched, can be kept at room temperature, and has a sheen to it (if that's your goal). Thus, before making your crack, it's worth considering whether you'd rather store it at room temperature or if you have room in your fridge to keep it, and proceed accordingly. 

It's worth pointing out that putting tempered chocolate atop toffee isn't without its own challenges. Sometimes the chocolate will separate from the toffee layer (I've experienced this after making almond roca). As a result, some chocolatiers choose to top toffee with melted chocolate (not tempered) because it will adhere better, but then sprinkle nuts over the top to hide the inevitable bloom that appears. There's no right or wrong here -- it's a choice to be made. And no one will fault you for more sprinkles or nuts!

All this said, the most important decision, in my opinion, is whether to make it or not, because, despite this blog post, if you choose to make Christmas "Crack" you really can't go wrong. Whether the toffee is chewy or brittle, whether the chocolate is tempered or not, the end result is delicious -- nay, addictive.

Tell me, have you tried making Christmas "Crack"? How did it turn out? 

Happy holidays everyone!


2023 Christmas Assortment

Now that the majority of the boxes have been delivered, I can blog more specifically about this year's Christmas assortment!

For 2023, I made 30 four-flavour boxes, up from last year's 24. This was deliberate on my part, since I had planned to offer a few up for sale on Facebook for those who don't normally get to try my chocolates. Thanks to slightly larger batch sizes for two of the recipes, I also unexpectedly had enough pieces to pack 12 two-flavour boxes, half of which I also intended to sell. Unfortunately, my plan was foiled last week when my travel itinerary abruptly changed due to weather and I left for home two days early. I handed out the extra four-flavour boxes to individuals in the hall before leaving campus and tossed the six remaining two-flavour boxes into my carry-on to give out at our annual Crappy Craft Night

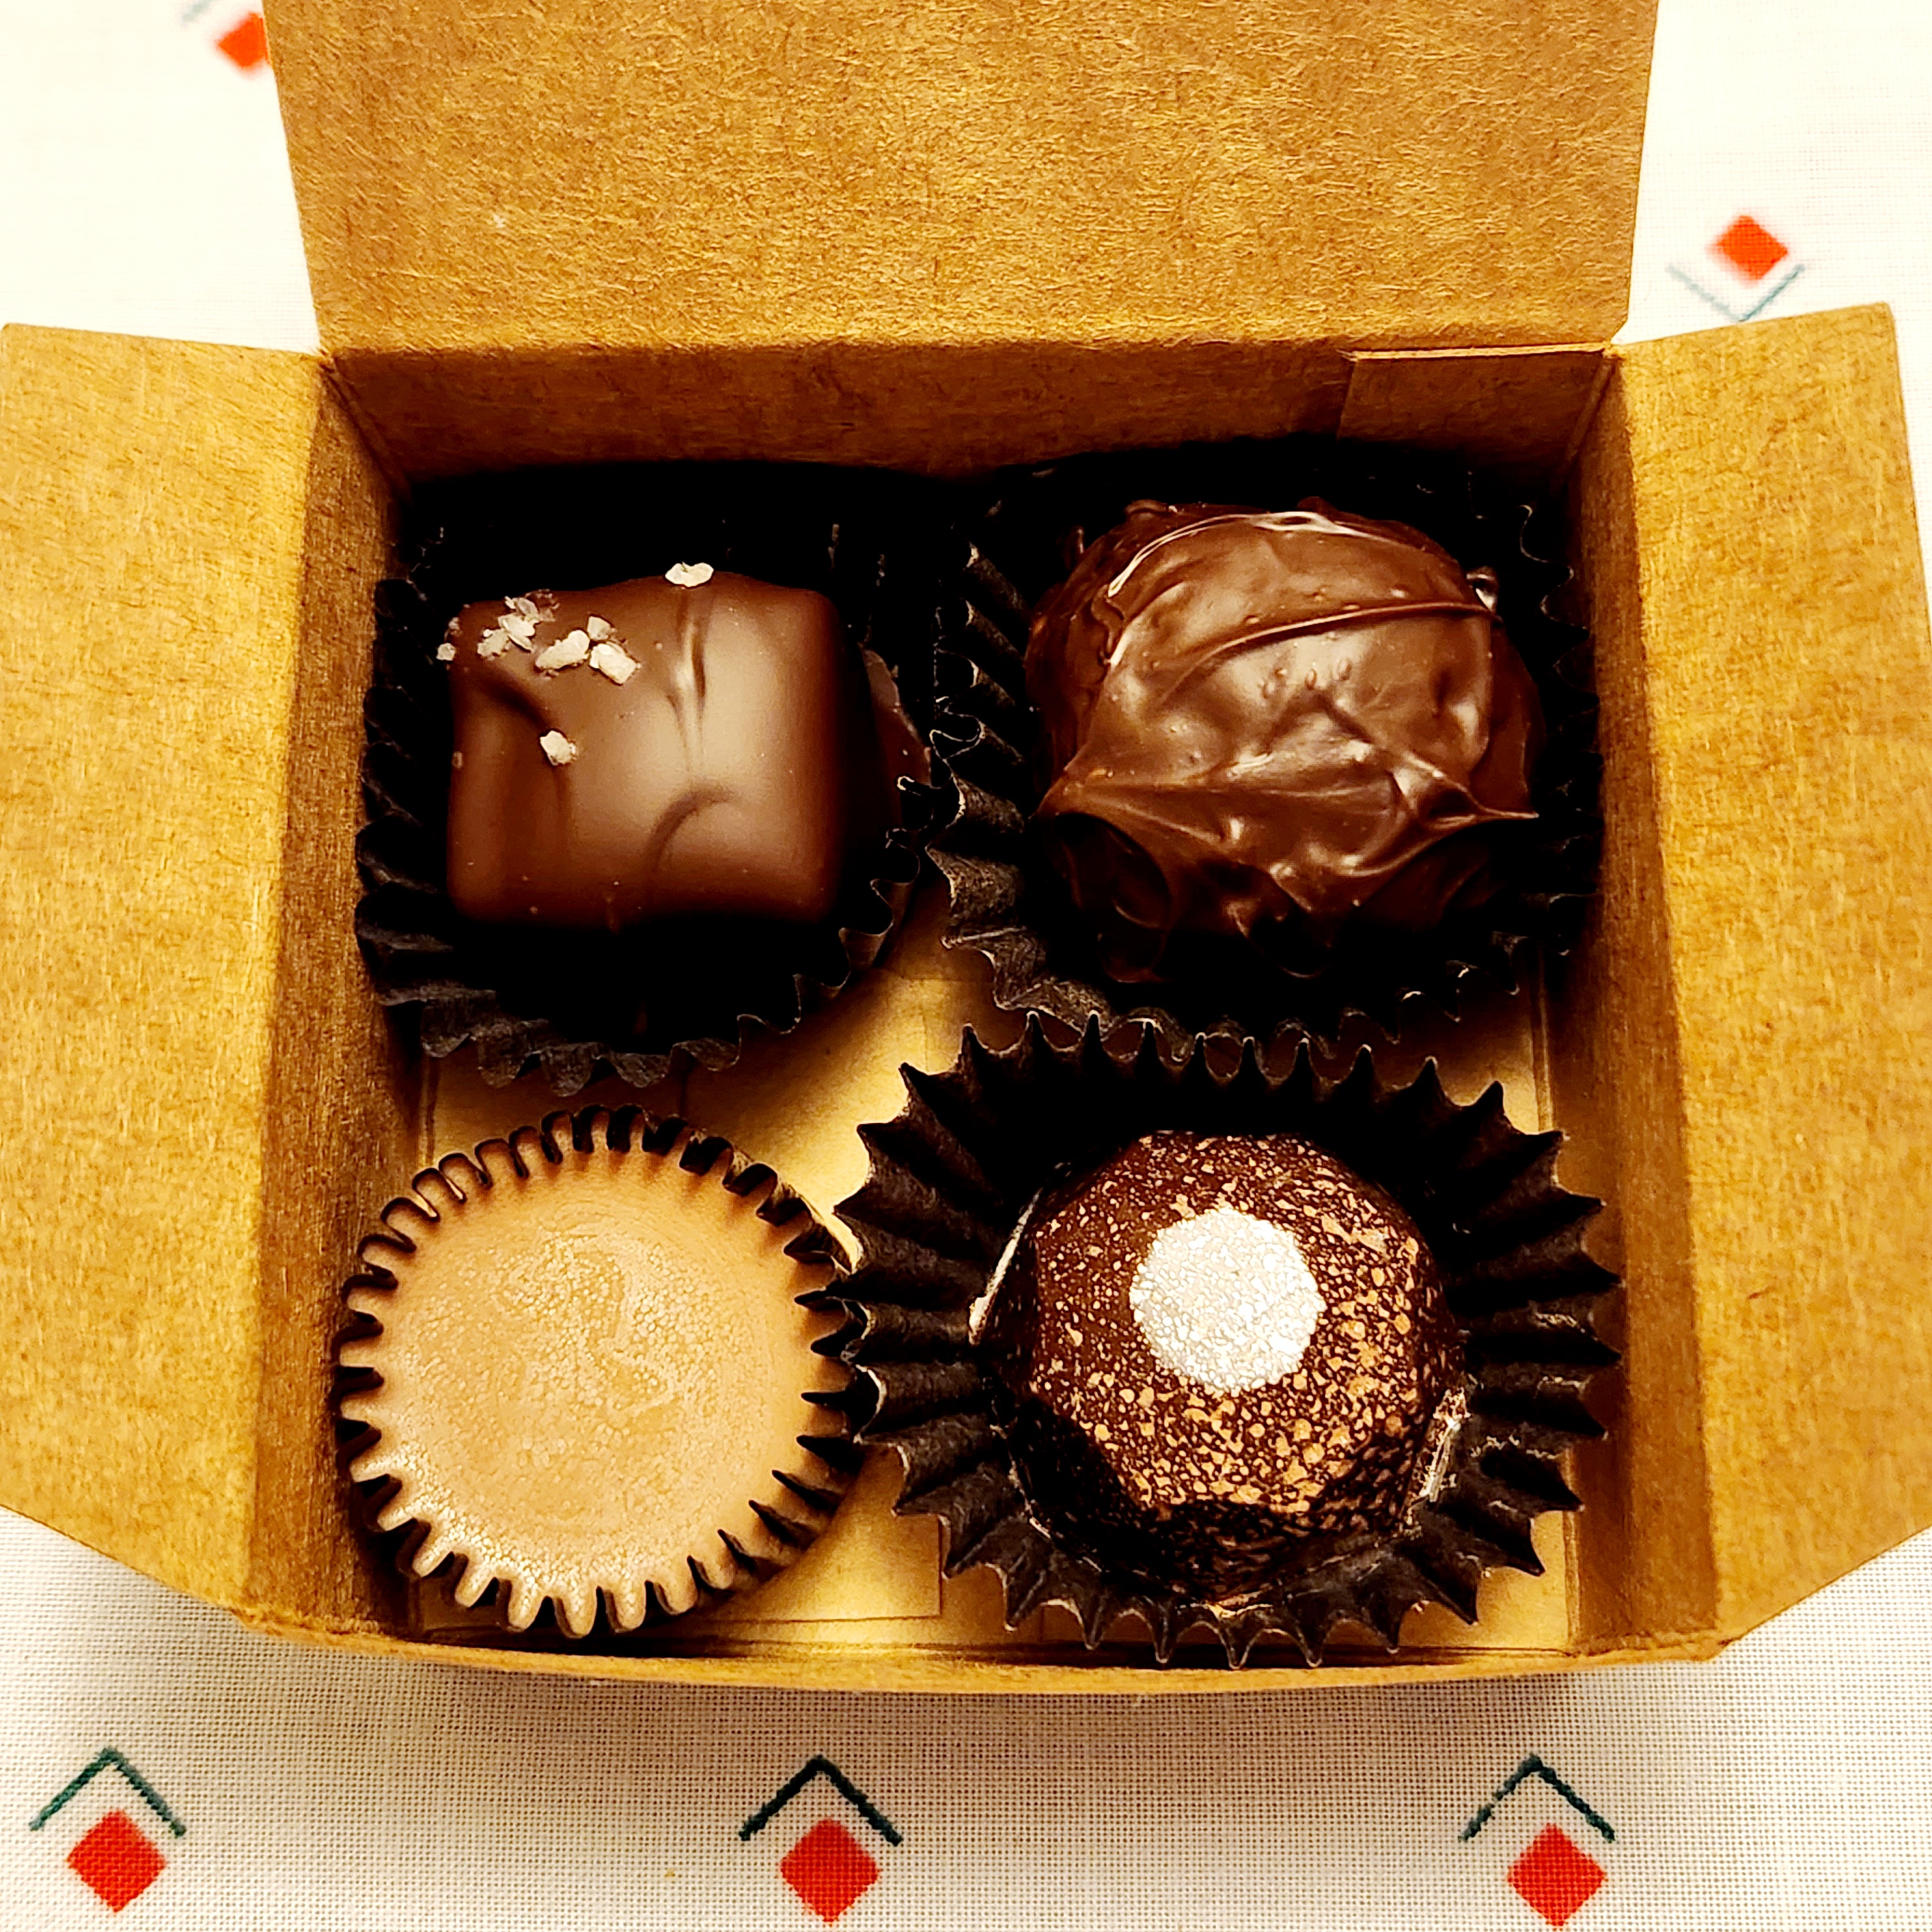
The four-flavour box included a salted caramel enrobed in dark chocolate, an orange cardamom truffle hand-rolled in dark chocolate, an apricot brandy praline with a dark chocolate shell, and a milk chocolate peanut butter meltaway. The salted caramel featured Sonoran sea salt, given to me by a friend who lives in Arizona. The orange cardamom truffle was prepared using whole cardamom pods, given to me by another friend earlier in the year. The peanut butter meltaway contained no special ingredients, but was a departure from the usual mint meltaway (and I think it would make a delicious filling in the future). But the really special creation this year was the apricot brandy praline.

A nod to my grandmother, who was known to keep a bottle of apricot brandy in the crisper drawer of the refrigerator, this praline has been in the works since January. It was then that I decided I would try a layered bonbon, initially thinking I would pair an apricot brandy ganache with a layer of marzipan, since I love the combination of apricots and almonds. In July, while in Newfoundland, I purchased a bottle of apricot brandy, since it doesn't appear to be available in any Nova Scotian liquor stores (in comparison, NLC had several different brands to choose from -- obviously Newfoundlanders like their apricot brandy). By the fall, my thinking had evolved and instead of pairing the ganache with marzipan, I decided to pair it with apricot jam to brighten and emphasize the apricot flavour. Featuring a dark chocolate shell decorated with copper edible luster dust, the final product had a dollop of apricot jam encased in apricot brandy ganache. And while I only got to try one of them before packaging, I think the jam was the right decision to create a burst of flavour. I was thrilled with the results -- a true homage to Honora. 

After filling 30 shells with apricot brandy ganache, I found myself with enough ganache to make another 20 truffles, and so I piped and rolled and hand-enrobed those as well. They were paired with the remaining peanut butter meltaways to create smaller treat boxes. While the truffles hit a little different than the pralines, due to the absence of the apricot jam, they still pack a flavour punch. 

I'm very pleased with how this year's assortment turned out. I think it's some of my best work, not only in terms of the flavours, but also in terms of the execution. This is the first year that I've nailed the temper of my chocolate for every piece that I produced. And I finally feel like I'm getting the hang of hand-rolling truffles. 

Hopefully those lucky enough to receive these boxes enjoyed them. Chocolate made in truly small batch quantities is qualitatively different from that which is mass-produced. And every piece is a labour of love. 

The best things really do come in small packages. 


Transfer Sheets

It wouldn't be Christmas without chocolate bark, right? 

Every year, I make at least one batch of bark. I like to try different inclusions and toppings (though I'm not sure anything will ever top the milk chocolate potato chip bark from a few years ago). As I thought about the bark for this year, I was focussed on using up some leftover gingerbread. I've always tried to be creative to avoid food waste, but in these days of inflation and shrinkflation, "waste not, want not" hits a little different. Have you seen the price of butter and sugar lately? I digress...

And so I blitzed up 75 grams of gingerbread (which was baked to more of a gingersnap texture) and added it to 400 grams of tempered dark chocolate. The result? Eight bags of gingersnap bark for giving this season. 

But I did make one deviation from my normal method. You see, with all of this reading I've been doing, I was reminded of transfer sheets -- plastic sheets decorated with cocoa butter. Using a transfer sheet was one of many decorating options in my professional chocolatier program years ago and so when I bought my school supplies, I ordered three from Golda's Kitchen in Ontario (which sadly no longer exists). I used one sheet (gold swirls) when capping one of the bonbons in my assignments. I used another (hearts) pre-pandemic on some Valentine's chocolate bark topped with cinnamon hearts. Long forgotten in storage, there was one remaining sheet. I pulled it out and spread the tempered chocolate on it. 

The result?

My gingersnap bark may look like any standard chocolate bark from the top, but the bottom is covered in tiny snowflakes. Sort of the "business in the front, party in the back" of the chocolate world.

One day, I hope to have custom transfer sheets with my name on them like Kate Weiser for capping my confections. 

Until then, what's your favourite flavour of bark this time of year? 


Planning a Christmas Assortment Box

I've always made sweet treats to give to friends and family at Christmastime. It could be a s'mores chocolate bark with Teddy Grahams and mini marshmallows or Skor fudge, or some other confection. But after completing my professional chocolatier program in 2018, I began using Christmas as an opportunity to test new recipes and keep up my chocolate skills. First I would pick a few recipes to bring home to my parents, but this slowly transitioned into creating a small assortment for them. And since the smallest batch of chocolates I make tends to result in 20-25 pieces, I found myself filling about 20-24 boxes, reserving 6-7 to take home, and sharing what remained with friends and coworkers. Once I realized this was going to be "a thing," I ordered four-piece ballotin boxes and some personalized stickers to seal them. 

Last year's four-piece box included a cointreau dark chocolate truffle, a spiced molasses honeycomb toffee dipped in dark chocolate, a milk chocolate salted caramel, and a white chocolate fruit and nut cup with pistachios and dried cranberries. The assortment for 2021 featured a dark chocolate salted caramel, a milk chocolate orange truffle, a marzipan centre enrobed in dark chocolate, and a wintergreen meltaway. And the year before that, the boxes were filled with a sour cherry truffle, a fruit and nut cup with peanuts and raisins, a mint meltaway, and a dark chocolate salted caramel. 

You may see a pattern emerging here. There's always a truffle, because they are delicious and because I've been experimenting with efficient ways of forming, rolling, and enrobing. Sometimes I scoop and sometimes I pipe, but when it comes to enrobing them I've landed on hand rolling as my preferred method. Salted caramels are very popular and standard in most assortments, and they enable me to practice my skills using dipping forks. The remaining two pieces are more variable, but are usually designed to present variety in texture and/or type of chocolate (since my default tends to be dark chocolate). Importantly, across the four pieces, there are some with longer keeping limits, which allows me to produce some of the pieces throughout November, instead of having to produce everything over a day or two in December prior to packing. Some are less labour-intensive (like nut cups and meltaways) and some are more labour-intensive (like truffles and caramels). 

And so as I begin to plan for the 2023 assortment, I'm thinking about ideas for new flavours that have emerged from my chocolate study, as well as considerations of variety in chocolate, technique, shape, and finish, and practical concerns like keeping limits. I've been keeping notes throughout the year, which has led to more than four options, so decisions will have to be made -- like whether to maintain the traditional salted caramel or switch things up this year. And that decision will need to be made very soon, because production starts next week!

What is your favourite piece in a chocolate assortment? 

Crappy Craft Night

For the past six years, my sister and I have held an annual Crappy Craft Night in the week before Christmas. It's become one of my favourite nights of the year filled with friends, food, laughter, and -- of course -- crappy crafts.

Now, I've always been a crafty sort; my sister less so (though she does enjoy putting together model cars). And usually in my stocking, I would find a small craft kit to make an ornament at Christmastime. What I found about these craft kits is that they often were poorly conceived and assembled, with materials missing or incomplete instructions. Even as an accomplished crafter, it could be difficult to achieve the end result pictured on the package. I often ranted about this to friends and family.

Then one year, my sister happened to be in St. John's before Christmas and picked up a few children's craft kits at Michaels. We had a craft night in her living room, with a fire, some wine, and a few nibbles. We did more laughing than anything else as we assembled our crafts, realizing that no child could possibly successfully complete them (at least such that they resemble the package). In those early years, there was a strange penguin made of a gritty clay and some foam that never stayed together despite trying a variety of glues, a polar bear made of white pom poms, and wooden ornaments that you simply coloured with markers (the most successful of the lot). There was also this fellow:

This felt penguin, made by my sister, looks cute enough. But what you can't see is how the pieces of felt weren't cut to the right lengths (so that green band doesn't meet up in the back) and how the glue didn't actually hold the felt pieces together properly (so his red hat is partially open on the sides). That the jingle bell stayed on at all is a Christmas miracle.

Part of what made these early craft nights so funny was that my projects always seemed to work out, while my sister's were (at least in her opinion) utter failures. Of course, the kit was usually the problem, but I'm not sure my sister believed me when I said that.

For sheer entertainment value, we decided this had to become an annual event and began inviting friends to participate. Each participant was to pick out a child's Christmas craft kit and bring enough of that craft for everyone to make one. Purchasing the kits from dollar stores or the discount section of Michaels was strongly encouraged.

Over the years, we've made paper snowflakes, jingle bell snowmen, perler bead ornaments, felt Santas, decorated gift bags... The highlight of one year was the Makit and Bakit "stained-glass" ornaments that had to be baked in the oven so that the coloured plastic pieces melted together (the fumes nearly killed us).

For the fifth anniversary of Crappy Craft Night last year, we decided to decorate gingerbread houses using kits. The kits, of course, contained old, dried out royal icing and therefore were epic failures -- which only made the night better. I didn't have a kit, because I'd arrived home from Cape Breton so late that there were none left in Corner Brook (Trooper Ron drove me all around town, certain that we'd find one somewhere, but we were unsuccessful). I ended up buying the pieces for a train at Bulk Barn and making my own royal icing.

And this year -- 2017 -- we had a Crappy Craft Night: Paint Night Edition. We all followed a YouTube tutorial to paint a snowman (click here if you're interested in trying that out yourself). We bought crappy acrylic paint and brushes, and Trooper Ron made some impressive easels out of kindling in just 15 minutes, and we tested our abilities to follow the tutorial. There was a sense among some that the video was too advanced -- but everyone finished it and all of the paintings looked great in the end. It definitely was one of the more intense Crappy Craft Nights, though.

You see, it may just be Crappy Craft Night, but we're all pretty serious about it.

And the marker of a great CCN is when we laugh so much that my sister needs her Ventolin inhaler.

This is by far one of the best Christmas traditions ever and I can't wait for the next Crappy Craft Night, when we'll return to the original crappy kid's craft kit format!