Showing posts with label caramel. Show all posts

Dulce de Leche Espresso Hearts

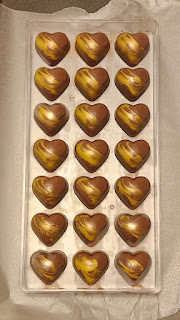
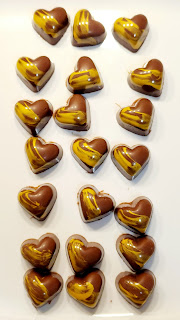
During the reorganization of my chocolate supplies a few weeks ago, I found a heart mold that I had purchased during my professional chocolatier program but never used. With Valentine's Day quickly approaching, it seemed like an ideal opportunity to test it out. And then after reading through ganache recipes one Tuesday night, I was inspired to try making a milk chocolate heart filled with dulce de leche and espresso ganache.

I chose milk chocolate for a few reasons. First, I have a lot of it because I primarily use dark chocolate in my production. Second, because I gravitate toward dark chocolate, I don't have enough experience tempering milk chocolate. As well, I haven't employed the piping bag method of shelling chocolates using milk chocolate. Guaranteed to be more tricky than dark chocolate, I wanted to try it. And practice does make perfect, right?  

These dulce de leche espresso hearts were a multi-step process: decorating the mold, shelling, piping the dulce de leche layer, piping the ganache layer, capping, and packaging. I spread these out over two weeks partly to make it more manageable and partly because I didn't realize how close February was and didn't buy cream with my groceries (and after 16 hours of writing spread over two days, I just didn't have it in me to run out to the store). 

Session One: Decorating and Shelling

I began by tempering some coloured cocoa butter to decorate the mold. Now, I just have to say that I was thrilled to finally try this again, since I hadn't done it in years. I purchased gold Roxy & Rich cocoa butter back in December when I replenished my dark chocolate supply. I've wanted it since 2018. And now it is mine! (My precious...)

Tempering coloured cocoa butter is easy. It just requires patience. You remove the cap from the bottle and pop it in the microwave for 10 seconds, then remove it and shake. Then another 10 seconds, remove, shake. And another 10 seconds, remove, shaky-shake. You get the picture. You progress in this fashion for about 1 minute and thirty seconds and eventually some of the cocoa butter melts while some of it remains solid. And by shaking, you ensure the temper of the cocoa butter. 

I dispensed a small amount into a pinch bowl, rolled a latex cot over my finger (thank you Shoppers Drug Mart), and then finger painted the molds. I decided to swipe only once from top right to bottom left, and in less than a minute I was done. The encouraging part of it all was that the gold cocoa butter began to solidify almost immediately, so I knew it was in temper. 

Next, I tempered 350 grams of milk chocolate and filled a piping bag. Using the "human depositor machine" method, I filled each heart, tapped the mold to remove air bubbles, and then inverted the mold to let the excess chocolate drain out onto a piece of waxed paper. Then I placed the mold on a tray in the fridge for 10 minutes. Now, I didn't quite get all of the air bubbles out and the shells are a bit thick in spots, but I was happy with the results nevertheless. It's a much cleaner way of working and in the future if my chocolate is just a little warmer and I tap it a little longer, I think I can solve the issue of it setting too quickly. (Yes, this means there will be more milk chocolate bonbons molded in the future.)

At this point, I set the shelled mold aside to await the next steps. 

Session Two: Layering Dulce de Leche and Espresso Ganache

The second production session occurred on a Sunday morning, passing the time during snowmageddon. I started by making a small batch of milk chocolate espresso ganache, so that it could cool while I was piping the dulce de leche layer. I measured heavy cream, butter, espresso powder, and milk chocolate into a bowl and went the old-fashioned bain marie route to melt it all together. About 10 minutes later, I had a beautiful ganache. I removed it from the heat to cool. 

Next, I poured my dulce de leche into a piping bag. With right hand applying pressure by squeezing the bag and left hand controlling the flow by pinching about a half inch above the opening, I very slowly deposited a small amount of dulce de leche into each heart. The dulce de leche was very fluid and shouldn't set while inside the chocolate, so the hearts should ooze when bitten into. 

Then I checked the temperature of the ganache. While it was starting to set, it was still 37 degrees -- far too hot to pipe into the mold because it could take the shell out of temper. I gave it a good stir and left it for ten minutes. Still too warm when I checked it, I left it for another fifteen minutes. When I returned, it was at 27 degrees, so I knew it was safe to pipe. 

Using the same method as for the dulce de leche, I quickly piped the ganache over the first layer. This part was tricky. To avoid the heavier ganache sinking through the dulce de leche and creating a total mess, I had to pipe at an angle across the surface of the dulce de leche faster than it could ooze upwards. For the most part, it appears to have worked well. With a toothpick, I knocked down any ganache peaks that were high enough to impede capping. Then I left the ganache to fully crystallize on top of the dulce de leche. 

Session Three: Capping

Still snowed in, the third session occurred early on a Tuesday morning. I gathered my supplies (chocolate, a silicone bowl, a piece of acetate, and a drywall knife), and prepared myself for capping. It can be tricky business and it's critical for shelf-life.

First I tempered a small amount of milk chocolate (but also about 4x more than I needed). After two temper tests to ensure it really was going to set properly, I spooned three lines of chocolate onto my mold -- one at the top of the mold, one along the second row of hearts, and one about half-way down the mold. Then I lined up the edge of the acetate with the edge of the mold and scraped across the full mold with the drywall knife. I've tried this method several times, but this was the first time that I got the right amount of chocolate on the mold. After admiring my work for a brief second, I cleaned up the edges (and snapped a photo) and put the mold into the fridge for 13 minutes.

Next, I inverted the mold onto a tray and lifted it to see if any would fall out on their own. None did. In the past, I have tapped the edge of the mold on the counter to release the chocolates, but inevitably a few (or many) would come out cracked as a result (I guess I was probably tapping with too much force). So, instead, this time I tapped the mold with a wooden spoon, as I had seen in an Instagram reel by Kate Weiser Chocolate. Sure enough, one by one, the hearts dropped cleanly from the mold. And when I moved aside the mold and spoon to assess my work, I was absolutely thrilled. The shine on the chocolates was incredible. 

Session Four: Packaging

A few days after finishing these hearts, I checked my stash of packaging and confirmed what I already knew: I didn't have anything suitable for single chocolates. I have a large quantity of 2-piece and 4-piece boxes, as well as a variety of cellophane and paper bags. Alas, nothing for one piece. It was time to get crafty.

And so I went onto the Silhouette Design Store to look at cut files for boxes. Eventually I found a simple triangular box that should work. I downloaded it and began manipulating it to get the right size and fit as many on a single piece of cardstock as possible. After a few tests, I cut one dozen boxes and assembled them.

I popped each chocolate into a mini cupcake liner (so that the chocolate wouldn't come into contact with the cardstock that I used) and then carefully slid one into each box. I folded down the flaps and closed the boxes with heart stickers. Then I put them in an airtight container to await their delivery. 

Final Thoughts

As I finish writing this blog, I haven't tried one of my dulce de leche espresso hearts yet. I've tried all of the components, but I won't know how they work together for certain until sometime next week when I permit myself to indulge. But I can say that I'm very pleased with how they came together. The design is precisely what I envisioned, the milk chocolate is in perfect temper, and thanks to new production techniques the work was more controlled and cleaner. And this is the first time ever that I've had all pieces completed in sellable condition - no major bubbles, no marred finishes, no cracks, and no bloom. 

In short, I'm thrilled.

Happy Valentine's Day or Galentine's Day or Whatevertine's Day! 

Any excuse to eat chocolate, am I right?


Christmas "Crack"

How many of you make Christmas "Crack" at this time of year? 

Most commonly it's made with a layer of saltine crackers covered in caramel (or toffee) and topped with chocolate. A number of variations exist, employing Ritz crackers, pretzels, or graham crackers as the base. Some people add sprinkles or chopped nuts to the chocolate layer, while others drizzle with white chocolate to decorate. Regardless, the end result delights the senses: sweet and salty, crunchy and creamy. It's very more-ish. 

My sister and I have made this a few times now, after finding a recipe on Pinterest. We've had mixed results. The first year, the caramel was more firm, but the second year it was very soft, sticky, and gooey. Both years, the treat had to be kept in the fridge to ensure the chocolate was set. 

As a chocolatier, I find the recipe to be infuriating, since it isn't written to promote success. It doesn't give the temperature to which the sugar should be cooked, and the method of applying the chocolate ensures it will not be in temper (and therefore will not properly solidify without refrigeration). And if refrigeration is necessary to keep the chocolate firm, then the caramel layer will get stickier and stickier, as the sugar (which is hygroscopic) attracts and absorbs moisture from the fridge. 

Now, maybe that's ok. Maybe people want more of a soft caramel than a toffee atop the crackers. Maybe people like the stretchy, sticky "caramel" layer? (My mother said she prefers it this way.) Maybe chocolate melting on your fingers as you break it apart is ok? (It's certainly tasty.) But if that's not what you're looking for, then read on!

There are so many recipes floating around the internet that it can be difficult to know which ones are good and which ones won't turn out. When it comes to Christmas "Crack," if it doesn't require you to have a candy thermometre (or tell you how test which cooked sugar stage you've reached), then you have to accept that the result will be hit or miss. This is basic science. The temperature to which sugar is cooked will determine its crystal structure -- the higher the temperature, the more firm it becomes. Cook it to soft ball and you've got a soft caramel or fudge texture, firm ball and you've got something more like a firm caramel or nougat. To achieve a snappy toffee or brittle texture, the sugar has to be cooked to hard crack -- and that can't be reached by boiling the sugar for only 30 seconds as our recipe indicated, nay, warned us not to surpass. (I admit, I ignored this warning and let it boil a few minutes longer than recommended, though I resisted the urge to break out a thermometre.) All to say, before you make your crack, it's worth considering whether you'd prefer a chewy caramel or crunchy toffee texture, and look for a recipe that supports that goal. 

Regarding the chocolate, some recipes tell you to sprinkle the chocolate over the top of the hot pan when it comes out of oven, while others tell you to melt it in the microwave and then spread it over the top. In either scenario, if you're using real chocolate, it will come out of temper (even if you melted it the right way to maintain temper), because the temperature is just too high. It will require refrigeration to solidify and it will likely experience bloom. You could let the crackers and cooked sugar cool for a few minutes before adding the chocolate (which is what we did), and as long as the chocolate was melted in a way that maintained its temper, then it will solidify at room temperature within about 5 minutes. (The way to do this is to melt the chocolate in the microwave in short bursts at 50% power (20-30 seconds each, stirring each time), stopping while there are still pieces of chocolate remaining, and letting the residual heat melt out those remaining pieces while stirring.) You'll have chocolate that doesn't melt when touched, can be kept at room temperature, and has a sheen to it (if that's your goal). Thus, before making your crack, it's worth considering whether you'd rather store it at room temperature or if you have room in your fridge to keep it, and proceed accordingly. 

It's worth pointing out that putting tempered chocolate atop toffee isn't without its own challenges. Sometimes the chocolate will separate from the toffee layer (I've experienced this after making almond roca). As a result, some chocolatiers choose to top toffee with melted chocolate (not tempered) because it will adhere better, but then sprinkle nuts over the top to hide the inevitable bloom that appears. There's no right or wrong here -- it's a choice to be made. And no one will fault you for more sprinkles or nuts!

All this said, the most important decision, in my opinion, is whether to make it or not, because, despite this blog post, if you choose to make Christmas "Crack" you really can't go wrong. Whether the toffee is chewy or brittle, whether the chocolate is tempered or not, the end result is delicious -- nay, addictive.

Tell me, have you tried making Christmas "Crack"? How did it turn out? 

Happy holidays everyone!


2023 Christmas Assortment

Now that the majority of the boxes have been delivered, I can blog more specifically about this year's Christmas assortment!

For 2023, I made 30 four-flavour boxes, up from last year's 24. This was deliberate on my part, since I had planned to offer a few up for sale on Facebook for those who don't normally get to try my chocolates. Thanks to slightly larger batch sizes for two of the recipes, I also unexpectedly had enough pieces to pack 12 two-flavour boxes, half of which I also intended to sell. Unfortunately, my plan was foiled last week when my travel itinerary abruptly changed due to weather and I left for home two days early. I handed out the extra four-flavour boxes to individuals in the hall before leaving campus and tossed the six remaining two-flavour boxes into my carry-on to give out at our annual Crappy Craft Night

The four-flavour box included a salted caramel enrobed in dark chocolate, an orange cardamom truffle hand-rolled in dark chocolate, an apricot brandy praline with a dark chocolate shell, and a milk chocolate peanut butter meltaway. The salted caramel featured Sonoran sea salt, given to me by a friend who lives in Arizona. The orange cardamom truffle was prepared using whole cardamom pods, given to me by another friend earlier in the year. The peanut butter meltaway contained no special ingredients, but was a departure from the usual mint meltaway (and I think it would make a delicious filling in the future). But the really special creation this year was the apricot brandy praline.

A nod to my grandmother, who was known to keep a bottle of apricot brandy in the crisper drawer of the refrigerator, this praline has been in the works since January. It was then that I decided I would try a layered bonbon, initially thinking I would pair an apricot brandy ganache with a layer of marzipan, since I love the combination of apricots and almonds. In July, while in Newfoundland, I purchased a bottle of apricot brandy, since it doesn't appear to be available in any Nova Scotian liquor stores (in comparison, NLC had several different brands to choose from -- obviously Newfoundlanders like their apricot brandy). By the fall, my thinking had evolved and instead of pairing the ganache with marzipan, I decided to pair it with apricot jam to brighten and emphasize the apricot flavour. Featuring a dark chocolate shell decorated with copper edible luster dust, the final product had a dollop of apricot jam encased in apricot brandy ganache. And while I only got to try one of them before packaging, I think the jam was the right decision to create a burst of flavour. I was thrilled with the results -- a true homage to Honora. 

After filling 30 shells with apricot brandy ganache, I found myself with enough ganache to make another 20 truffles, and so I piped and rolled and hand-enrobed those as well. They were paired with the remaining peanut butter meltaways to create smaller treat boxes. While the truffles hit a little different than the pralines, due to the absence of the apricot jam, they still pack a flavour punch. 

I'm very pleased with how this year's assortment turned out. I think it's some of my best work, not only in terms of the flavours, but also in terms of the execution. This is the first year that I've nailed the temper of my chocolate for every piece that I produced. And I finally feel like I'm getting the hang of hand-rolling truffles. 

Hopefully those lucky enough to receive these boxes enjoyed them. Chocolate made in truly small batch quantities is qualitatively different from that which is mass-produced. And every piece is a labour of love. 

The best things really do come in small packages. 


When I dip, you dip, we dip...

Dipping centres in chocolate is perhaps my least favourite task as a chocolatier -- and that's because it's tricky. If it can go wrong during enrobing, then I've experienced it. I've always struggled to avoid too much of a "foot" on the finished piece. I've also battled over-crystallized chocolate that clings to the dipping fork and leaves marks on the bottom of the chocolate. And as the saying goes, once bitten, twice shy. 

The viscosity of the chocolate, the temper, and the working temperature are all important factors in getting this right. Unless of course you're using compound chocolate or you're adding something like shortening to the chocolate to change the fluidity and/or the set -- but we don't do that around here! On top of this, a good working set-up is crucial so that the movements feel natural. And this is where this week's study has paid off. 

In the Greweling book, there is a diagram of the appropriate set-up for a right-handed chocolatier when dipping centres: undipped centres on the left, tempered chocolate in the centre (tilted toward the chocolatier), and an empty tray on the right to receive the dipped centres (which is filled from right to left). I decided it was definitely worth trying one more time before switching to another method like hand-dipping to see if I would have greater success.

I set up on my dining room table, with caramels on a tray to my left, a thick book directly in front of me, and an empty tray lined with waxed paper to my right. I set a small bowl of coarse sea salt at the back of the tray and got my dipping forks out. Then I tempered my chocolate. It was a little warmer than I normally work with, but when I did the temper test it started to set within 3 minutes, so I proceeded. I placed the bowl of chocolate in the centre, propping the back of the bowl up on the book.

I held the dipping fork in my right hand. With my left hand, I picked up a caramel and dropped it into the chocolate. Then, with the dipping fork, I flipped the centre and then picked it up with the fork, "tapping" the centre on the pool of chocolate a few times before moving it to the empty tray. (This tapping motion uses the surface tension of the chocolate in the bowl to pull any excess chocolate off the centre.) After every four centres, I paused to sprinkle sea salt on the corner of the caramels. Then I stirred my chocolate to ensure even heat throughout the bowl. For a few centres, I tried an alternative method of submerging the centre and swiping the chocolate across the top of it before lifting it out of the chocolate with the fork. That seemed to work just as well, but I quickly reverted to the flip method. I continued in this way until I had the full batch coated. 

Throughout, I was surprised by how easy it seemed to be. First of all, the left to right action just felt smooth and there was no reaching required. Second of all, the tilted bowl made a huge difference, even just in the ability to see the centre without having to lean over the bowl. Finally, that slightly warmer chocolate meant there were no issues of over-crystallization and the chocolate was fluid enough that a huge foot didn't form around the chocolate. And the technique of letting the surface tension of the pool of chocolate pull the excess off of the dipped centre worked better as well because of the fluidity.

The result? This may be my best dipping experience ever!

And the first of four flavours for this year's assortment is now done and dusted (or, more appropriately, done and packaged in an airtight container while awaiting packing).  


Very Carefully Saw Off the Edges of the Cookies

A few months ago, a friend of mine found a chocolate bar making set at the local flea market. Knowing I was in a Professional Chocolatier program, she picked it up for me, reasoning that even if the contents of the kit itself weren't any good, the decorative tin that the molds and recipe book came in was worth the deeply discounted price. As I flipped through the recipe booklet, I thought they sounded interesting. I was particularly curious about two that involved shortbread cookies -- one layered with lemon curd and the other with caramel. And so last weekend, I decided it was time to test it out.

I started on Thursday evening making the shortbread cookies for the caramel shortbread chocolate bars. I was immediately suspicious of the cookie cutter included in the kit. It just barely fit inside the bar molds. I couldn't imagine how the resulting shortbread would fit into the molds once they were shelled with chocolate. Nevertheless, I decided to use it. I opened up the recipe booklet and was very confused by the instructions in front of me that called for cream and jam. Then I realized that there was a misprint in the booklet -- though the heading said caramel shortbread, the recipe was for some sort of jam and ganache layered bar. I flipped to the second recipe titled caramel shortbread and proceeded to make the shortbread.

The shortbread recipe was simple enough and it made a small quantity, which was perfect. But there was no salt in it, so I decided to add some for flavour and balance. I cut my cookies, still confused by the size of the cutter, and arranged them on a baking sheet. The instructions called for a 400F oven and 20 minutes of baking. I immediately knew that would lead to burnt shortbread. Instead, I heated my oven to 350F and baked them for 15 minutes -- and even then they were well done (but I assumed that would be an advantage when layering them with caramel). I put them in an airtight container once they cooled.

Then on Sunday I decided to temper some milk chocolate and proceed with making the bars. I painted the silicone molds with two coats of chocolate before sprinkling some pink Himalayan salt into the cavities and then piping in a layer of caramel. Then the moment of truth arrived. I was ready to place the shortbread cookies on top of the pool of caramel.

Well, guess what? They didn't fit. At all.

So I had to place each one on a cutting board and very carefully saw off the edges of the cookies with a serrated knife. There. Now they fit into the shells perfectly. To finish off the bars, I capped them with more milk chocolate and let them set in the fridge for five minutes. Once they were set, I carefully unmolded them and left them to crystallize for 24 hours before wrapping them in foil and pretty scrapbook paper.

The verdict? Well, I have some very pretty chocolate bars and frankly they do taste delicious. The texture of the crunchy shortbread against the creamy caramel and the smooth milk chocolate is great. But silicone molds are dreadful. I was impressed with the shine of the unmolded bars -- something that many say isn't possible with silicone -- but the actual process of shelling and capping was tedious as best. The usual methods of tapping and scraping off excess chocolate just don't work.

Nevertheless, I'm really glad that I had the chance to make these bars using this set. Not only did it confirm the value of polycarbonate molds for production, but also the shape of bar that I'd like to be making. Before making these, I probably would have purchased the rectangular bars with the very sharp corners. But once the bars were unmolded and I was wrapping them, I preferred the ones that were rounded.

I'm also really glad to have taken the time to continue practicing the techniques that I learned in my program and to have experimented with a cookie layer -- which I'm sure I'll do again.

Liquid Hot Magma

I mentioned in an earlier post that part of what I like about the professional chocolatier program is that I'm being forced to try new things. This was the case last Sunday, when one of the assignments required that I make a caramel -- something I had never done before. And let me tell you, it was terrifying.

In an effort to put my own twist on a classic caramel recipe, I decided to use equal parts of white sugar and fancy molasses. Knowing that once sugar gets going, it can spike in temperature quickly, I decided a mise en place set up was necessary. I also pulled a Martha Stewart and added a bowl of ice water in case of burns. And then I started.

The first part of melting sugar and starting to cook it is rather slow and unremarkable, though I do seem to have an irrational fear about sugar burning (perhaps that stems from the fact that if the alarm in my apartment is triggered, the entire building will have to evacuate). As it gets hotter and hotter, of course, it starts bubbling and spurting. As my thermometre crept towards 255 degrees, I was a little anxious about the whole thing. I also couldn't get Dr. Evil out of my head.


Eventually, I hit the desired temperature, removed the liquid hot magma from the burner, and added the vanilla -- which of course caused a new round of spurting and bubbling almost to the point of bubbling over, but not quite.

Following the recipe, I stirred with a wooden spoon and then poured the caramel into a prepared pan. Finally, I sprinkled some pink Himalayan salt over the surface of the caramel while it was still hot so that the salt would sort of melt into the surface.

No need for the bowl of ice water. That was a success in my books.

And then I waited. After about an hour, I poked the surface to see whether it was setting up -- and it was! But I left it for another five hours to be sure it was fully cooled and set before cutting it.

Cutting was surprisingly easy. I wanted a rectangular shape instead of squares to have some variety in the appearance of the bonbons that I would submit. Of course, you don't need a large batch of caramel to end up with an inordinate number of caramels. And when you're cutting them to be enrobed in chocolate, you actually need to account for the thickness of the coating so that you don't end up with a massive treat at the end. I think I ended up cutting this into 96 pieces. And then I was filled with regret: How was I going to enrobe 96 caramels in dark chocolate? Surely that would take forever. And the reality is, I only needed one perfectly dipped caramel to photograph and submit.

I tempered my dark chocolate and prepared for the great enrobing extravaganza. And I discovered something. While my caramel was the perfect texture for eating, it wasn't quite as firm as I would have wanted for enrobing in chocolate. While tempering the chocolate, the caramels had started to slump a little. I was mildly annoyed (and made a mental note to cook it to 260 the next time), but pressed on.

I probably enrobed about 30 pieces of my batch. Each one was dipped in chocolate and then, as per assignment requirements, embellished by tapping the tines of the dipping fork across the surface. It does create a very nice effect.

I wrapped the remaining (undipped) caramels in parchment wrappers. It occurred to me that, while I couldn't really mail my chocolates home to my parents to try -- too delicate without appropriate packaging, plus the cost (which would be about $15) -- I could easily send home molasses caramels. Not only were they less delicate, they also were thin enough to be packed in a bubble mailer and sent regular mail (for only $1.80). Knowing Trooper Ron loves molasses, I put together a package and sent them off. The others, I took to work and shared with friends.

It's perhaps a little difficult to see the detail in this picture -- dark chocolate is difficult to photograph, especially on a white background -- but I'm really happy with how these turned out. And I do plan to try the recipe again to see if I can get a slightly firmer texture that won't slump. Enrobed in chocolate, though, they came out looking like caramel logs -- not a bad outcome.

More importantly, I'm no longer afraid of cooking caramel. Maybe there will be fudge in my future.