Showing posts with label ganache. Show all posts

Raspberry Easter Eggs

Over the years, I've made many different Easter eggs. Peanut butter fudge, Cadbury creme egg dupes, strawberry cream, orange creamsicle, Oreo cookie, potato chip, Rice Krispies, peanut gianduja... They've all been delicious and it would be easy to just pick one and repeat it (especially a peanut butter one). But Tuesday night chocolate study and this blog aren't about what's easy! They're about trying new things and learning in the process. And so as much as I'd like to be making myself a gianduja bunny again, this year's Easter eggs will instead have a dark chocolate raspberry ganache filling.

Now, I've experimented with ganache a fair amount, particularly with alcohol as the flavouring. Beer, cider, port wine, Cointreau, brandy... I've also made a variety of truffles flavoured with oils (peppermint, orange, key lime, lemon, strawberry), and even a few that used pulverized freeze-dried fruit. But I can't recall making a truffle with fruit puree (though I certainly used fruit purees in buttercream frosting when I was doing more cake decorating).

In preparation for my Tuesday night chocolate study, I reviewed a number of recipes. I settled on a recipe in the Ewald Notter book The Art of the Chocolatier as a base recipe upon which I would riff. And that meant I needed to make raspberry puree.

I started with half a bag of frozen raspberries, tossed them into a pot with about 20 grams of sugar, and heated and stirred until they started to break down and become liquid. Then I pureed them and strained out the seeds, first with a mesh strainer and then with multiple layers of cheese cloth. Neither was particularly efficacious. After significant effort (and mess), I had about 120 grams of puree. I set it in the fridge and called it a night.

The next day, I prepared the ganache. Based on the quantities outlined in the Notter book, I decided to half the recipe. I have to admit, I was a little bit nervous making this ganache. I've never added lemon juice to chocolate and I worried that it might break or seize. Presumably the addition of lemon juice was meant to enhance the flavour of the raspberry puree, so once the ganache was a beautiful emulsion, I took a deep breath and added the acid to the mixture. The gods favoured me and the ganache didn't split. And the resulting flavour was incredible.

Sadly, the gods didn't favour me for long. I'm not sure if the chocolate I was using as seed was itself out of temper or (more likely) if I was impatient and rushed the process, but my first attempt at shelling was a failure. I knew when I took the mold out of the fridge that the chocolate was not in temper. So I started over. I wasn't present the first time around, but I was hyper-focused the second time and it worked as expected. 

Next I filled the shells and set the mold aside to crystallize before proceeding with capping the following day. When I tapped out the finished eggs, I had one casualty, which cracked coming out of the mold. The rest were perfect. 

As I write this, a week later, I am in the process of doing it all over again so that I will hopefully have 23 eggs in total to share with friends. The molds are shelled and filled, and tomorrow night before a museum board meeting, I hope to cap them.

Now, about that casualty. I did not discard it. Nay, I uncharacteristically ate it. (If you've been reading these blogs long enough, you know that I don't normally sample the finished product so soon after it's been made). What can I say about these eggs? They are incredible. The raspberry flavour is intense. The pairing with dark chocolate is ideal, ensuring the eggs aren't overly sweet. While I'm not a huge lover of raspberry, I would definitely make these again. I'm thrilled with how they turned out and can't wait to share them with family and friends.

Yes, I said family. I don't normally mail chocolate home, but my sister's birthday is coming up and there is a Canada Post flat rate box headed her way. Conveniently, there's a little room left in it for three Easter eggs. Hopefully she and my parents will enjoy them (though I'm guessing they won't survive until Easter Sunday). 

This experiment definitely has me wanting to try additional chocolate and fruit puree pairings. I'm curious: What fruit and chocolate pairing would you use in an Easter egg? 

Dulce de Leche Espresso Hearts

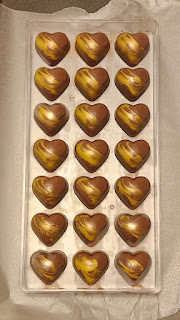
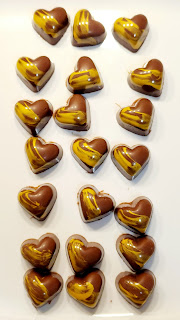
During the reorganization of my chocolate supplies a few weeks ago, I found a heart mold that I had purchased during my professional chocolatier program but never used. With Valentine's Day quickly approaching, it seemed like an ideal opportunity to test it out. And then after reading through ganache recipes one Tuesday night, I was inspired to try making a milk chocolate heart filled with dulce de leche and espresso ganache.

I chose milk chocolate for a few reasons. First, I have a lot of it because I primarily use dark chocolate in my production. Second, because I gravitate toward dark chocolate, I don't have enough experience tempering milk chocolate. As well, I haven't employed the piping bag method of shelling chocolates using milk chocolate. Guaranteed to be more tricky than dark chocolate, I wanted to try it. And practice does make perfect, right?  

These dulce de leche espresso hearts were a multi-step process: decorating the mold, shelling, piping the dulce de leche layer, piping the ganache layer, capping, and packaging. I spread these out over two weeks partly to make it more manageable and partly because I didn't realize how close February was and didn't buy cream with my groceries (and after 16 hours of writing spread over two days, I just didn't have it in me to run out to the store). 

Session One: Decorating and Shelling

I began by tempering some coloured cocoa butter to decorate the mold. Now, I just have to say that I was thrilled to finally try this again, since I hadn't done it in years. I purchased gold Roxy & Rich cocoa butter back in December when I replenished my dark chocolate supply. I've wanted it since 2018. And now it is mine! (My precious...)

Tempering coloured cocoa butter is easy. It just requires patience. You remove the cap from the bottle and pop it in the microwave for 10 seconds, then remove it and shake. Then another 10 seconds, remove, shake. And another 10 seconds, remove, shaky-shake. You get the picture. You progress in this fashion for about 1 minute and thirty seconds and eventually some of the cocoa butter melts while some of it remains solid. And by shaking, you ensure the temper of the cocoa butter. 

I dispensed a small amount into a pinch bowl, rolled a latex cot over my finger (thank you Shoppers Drug Mart), and then finger painted the molds. I decided to swipe only once from top right to bottom left, and in less than a minute I was done. The encouraging part of it all was that the gold cocoa butter began to solidify almost immediately, so I knew it was in temper. 

Next, I tempered 350 grams of milk chocolate and filled a piping bag. Using the "human depositor machine" method, I filled each heart, tapped the mold to remove air bubbles, and then inverted the mold to let the excess chocolate drain out onto a piece of waxed paper. Then I placed the mold on a tray in the fridge for 10 minutes. Now, I didn't quite get all of the air bubbles out and the shells are a bit thick in spots, but I was happy with the results nevertheless. It's a much cleaner way of working and in the future if my chocolate is just a little warmer and I tap it a little longer, I think I can solve the issue of it setting too quickly. (Yes, this means there will be more milk chocolate bonbons molded in the future.)

At this point, I set the shelled mold aside to await the next steps. 

Session Two: Layering Dulce de Leche and Espresso Ganache

The second production session occurred on a Sunday morning, passing the time during snowmageddon. I started by making a small batch of milk chocolate espresso ganache, so that it could cool while I was piping the dulce de leche layer. I measured heavy cream, butter, espresso powder, and milk chocolate into a bowl and went the old-fashioned bain marie route to melt it all together. About 10 minutes later, I had a beautiful ganache. I removed it from the heat to cool. 

Next, I poured my dulce de leche into a piping bag. With right hand applying pressure by squeezing the bag and left hand controlling the flow by pinching about a half inch above the opening, I very slowly deposited a small amount of dulce de leche into each heart. The dulce de leche was very fluid and shouldn't set while inside the chocolate, so the hearts should ooze when bitten into. 

Then I checked the temperature of the ganache. While it was starting to set, it was still 37 degrees -- far too hot to pipe into the mold because it could take the shell out of temper. I gave it a good stir and left it for ten minutes. Still too warm when I checked it, I left it for another fifteen minutes. When I returned, it was at 27 degrees, so I knew it was safe to pipe. 

Using the same method as for the dulce de leche, I quickly piped the ganache over the first layer. This part was tricky. To avoid the heavier ganache sinking through the dulce de leche and creating a total mess, I had to pipe at an angle across the surface of the dulce de leche faster than it could ooze upwards. For the most part, it appears to have worked well. With a toothpick, I knocked down any ganache peaks that were high enough to impede capping. Then I left the ganache to fully crystallize on top of the dulce de leche. 

Session Three: Capping

Still snowed in, the third session occurred early on a Tuesday morning. I gathered my supplies (chocolate, a silicone bowl, a piece of acetate, and a drywall knife), and prepared myself for capping. It can be tricky business and it's critical for shelf-life.

First I tempered a small amount of milk chocolate (but also about 4x more than I needed). After two temper tests to ensure it really was going to set properly, I spooned three lines of chocolate onto my mold -- one at the top of the mold, one along the second row of hearts, and one about half-way down the mold. Then I lined up the edge of the acetate with the edge of the mold and scraped across the full mold with the drywall knife. I've tried this method several times, but this was the first time that I got the right amount of chocolate on the mold. After admiring my work for a brief second, I cleaned up the edges (and snapped a photo) and put the mold into the fridge for 13 minutes.

Next, I inverted the mold onto a tray and lifted it to see if any would fall out on their own. None did. In the past, I have tapped the edge of the mold on the counter to release the chocolates, but inevitably a few (or many) would come out cracked as a result (I guess I was probably tapping with too much force). So, instead, this time I tapped the mold with a wooden spoon, as I had seen in an Instagram reel by Kate Weiser Chocolate. Sure enough, one by one, the hearts dropped cleanly from the mold. And when I moved aside the mold and spoon to assess my work, I was absolutely thrilled. The shine on the chocolates was incredible. 

Session Four: Packaging

A few days after finishing these hearts, I checked my stash of packaging and confirmed what I already knew: I didn't have anything suitable for single chocolates. I have a large quantity of 2-piece and 4-piece boxes, as well as a variety of cellophane and paper bags. Alas, nothing for one piece. It was time to get crafty.

And so I went onto the Silhouette Design Store to look at cut files for boxes. Eventually I found a simple triangular box that should work. I downloaded it and began manipulating it to get the right size and fit as many on a single piece of cardstock as possible. After a few tests, I cut one dozen boxes and assembled them.

I popped each chocolate into a mini cupcake liner (so that the chocolate wouldn't come into contact with the cardstock that I used) and then carefully slid one into each box. I folded down the flaps and closed the boxes with heart stickers. Then I put them in an airtight container to await their delivery. 

Final Thoughts

As I finish writing this blog, I haven't tried one of my dulce de leche espresso hearts yet. I've tried all of the components, but I won't know how they work together for certain until sometime next week when I permit myself to indulge. But I can say that I'm very pleased with how they came together. The design is precisely what I envisioned, the milk chocolate is in perfect temper, and thanks to new production techniques the work was more controlled and cleaner. And this is the first time ever that I've had all pieces completed in sellable condition - no major bubbles, no marred finishes, no cracks, and no bloom. 

In short, I'm thrilled.

Happy Valentine's Day or Galentine's Day or Whatevertine's Day! 

Any excuse to eat chocolate, am I right?


Repairing Ganache

Some of you may recall that last year I had a rather epic fail in my kitchen, when I made an orange white chocolate ganache to fill Easter eggs. I was baffled by it at the time and none of the salvage tips I could find online actually worked well enough for me to use it as planned. This week while continuing my chocolate reading, I found the explanation for what occurred and, more importantly, how to fix this issue in the future. 

According to Greweling, "A ganache that requires the addition of liquid to re-emulsify it is too high in fat. Its formula should therefore be adjusted for future batches" (Chocolates and Confections, p. 95). Now that I think about it, the white chocolate ganache I made, flavoured with orange oil and made with butter in addition to cream, definitely had a higher fat content than is the norm. Adding more cream and more melted white chocolate did nothing to fix the issue because those additions didn't improve the ratio of fat to water. Had I added milk or even water, I might have had a different result and more success in repairing the broken ganache. And when I remade the ganache the following day, I essentially did reformulate the recipe, because I used less butter and more cream, which in turn altered the ratio of fat to water. Heavy cream has a fat content of about 35%, while butter has a fat content of about 80%.  

The idea that a ganache could have too much fat has never been on my radar. Too much water, sure -- that would shorten the shelf-life. But too much fat? 

Usually when we talk about ganache, we talk about ratios of chocolate to cream (or whatever else is being used to soften the chocolate). Milk chocolate requires half as much cream as dark chocolate to achieve the desired effect and white chocolate requires half as much cream as milk chocolate. So the ratios we were taught really weren't expressed in terms of fat content, but in terms of the type of chocolate. When making ganache, it's not uncommon to substitute alcohol, butter, or even water for some or all of the cream, complicating things further. And while I've noticed that alcohol in a ganache causes it to behave differently, I simply attributed it to some characteristic of the alcohol and not specifically a change in the fat to water ratio. 

Once you deviate from a traditional ganache recipe, it seems, you have to pay attention to the fat to water ratio. Lesson learned. 

I also learned another interesting tidbit during this week's reading. Not enough to warrant a blog post, but fascinating nevertheless. I already knew that starch molding is a common method of making fondant, jelly, and cordial centres that are later enrobed in chocolate. I was first introduced to this confectionary technique while watching the YouTube videos of Hercules Candy. You press shapes into cornstarch (or another starch mixture), deposit liquid centres into the wells, leave them to crystallize, and then remove them from the starch mold to be covered in chocolate. But did you know that starch is flammable‽ (Yes, I just used an interrobang. It seems appropriate in this context.) Greweling cautions, "Should a large quantity of [starch] become airborne and be exposed to an open flame, the result could be a flash fire or explosion" (p. 90). 

While I'm all for experiential learning, I'm happy to acquire this knowledge by reading instead!


Spruce Tip Truffles

This week's chocolate study was an experiment that I've been meaning to do for, oh, five years or so? (But who's keeping track?)

During my professional chocolatier program, I got the idea that I should try making truffles with ingredients that are either traditionally part of Newfoundland foodways (like berries and molasses) or that were grown in Newfoundland (like hazelnuts and spruce tips). Fresh spruce tips, however, were not in season at the time that I was completing my various assignments. Freeze dried spruce tips weren't available either and I just couldn't imagine that pickled spruce tips would work. I put the project on hold. 

Spruce tips, if you aren't aware, are high in vitamin C. Depending on the variety and time of harvest, they can have a citrus-like or piney flavour. When left too long, I'm told they can smell like cat urine (definitely not the desired flavour profile). 

A year later, while visiting my sister, I spied the almost lime green, new growth on some trees. I quickly gathered a small bag to take back with me. I froze them and took care to transport them in a cooler, and then they landed in my freezer. Admittedly, I forgot about them for a few months (or more than a few months). And then the great power outage of 2020 struck. My apartment was without power for a month while I was on vacation in another province and the entire freezer had to be gutted (by a friend who deserves more and better for her efforts). So long, spruce tips.

Eventually, I had the opportunity to pick a new batch of spruce tips locally and once again popped them into the freezer (to languish...). But they found their way out of the freezer this week when I decided the time had finally come. 

I had leftover heavy cream. I had a small stash of spruce tips. And I needed a topic for a blog post. 

I heated the cream to a simmer and then added the spruce tips. Then I removed the pot from the heat and let the spruce tips steep for 30 minutes. Next, I weighed out chocolate for a small batch of truffles and added the appropriate amount of cream. A quick 90 seconds in the microwave and I was able to whisk together a luscious ganache. After leaving it to cool for a half hour, I scooped out 26 truffles and left them to crystallize. Then I refined their shape and rolled them in cocoa powder. 

Ta da! Spruce tip truffles!

Now, when I tasted the cream before combining it with the chocolate, it had a pronounced woodsy flavour. But the dark chocolate (not surprisingly) overpowered the spruce tips in the final mix. Consequently, the flavour is faint and doesn't register at all if the truffles are eaten cold.

I think the concept is solid, but the execution leaves something to be desired. First, additional experimentation will be necessary to determine the best ratio of cream to spruce tips -- and that will likely have to wait until next spring when I can harvest the tender tips once again. I am curious, however, about the possibility of acquiring some freeze-dried spruce tips and amping up the flavour by pulverizing some and rolling the truffles in the powder. Second, I may have to swap the 54% chocolate for white chocolate, which would provide a more neutral base for the delicate flavour. 

Nevertheless, I'm happy to finally have brought this idea to life and thrilled to have a container of delicious truffles in my fridge for a hit of chocolate whenever I like. I can see chocolate season approaching and I'm looking forward to putting new ideas into practice. And while there won't be a spruce tip truffle in this year's chocolate box, I'm sure there will be other delicious options.

Malted Graham Sandwich Bar

Last week I blogged about the Moirs Malted Graham Sandwich Bar that both a friend and a cousin had remembered and mentioned in conversation. And this week, I'm presenting my take on that same candy bar. Why? Well, life is short and when my brain fixates on something, it's best to just go with it. 

So here we are.

Graham crackers, I thought, would be the easy part of this endeavour. I located a recipe that looked good and had solid reviews. I mixed up the dough, using Bourbon Madagascar vanilla and Newfoundland honey that I've been saving for a special occasion. I followed the recipe to the letter and even chilled the dough before and after rolling. I selected what I thought would be the perfect size square cutter and I spaced them generously on the cookie sheet. And you guessed it! By the time they finished baking, my graham squares were a full half inch larger than intended. Note to self, next time choose the smallest cutter size. 

Next I turned to the malted cream filling. After giving it some thought, I decided that a whipped ganache was the way to go. It was an interesting decision considering that I've never made whipped ganache before, but from what I knew about it, I thought it would produce a creamier texture for the filling and, by whipping it, it should turn lighter in colour. So I researched malted ganache recipes. Finding some made with white chocolate and some with milk, I wasn't quite sure how to proceed. But knowing that white chocolate is often sickly sweet, I decided to try something new yet again and made the ganache with two parts white chocolate and three parts milk chocolate. I dissolved the malt powder in the heated cream before pouring it over the chopped chocolate. After leaving it for 5 minutes, it whisked into a beautiful ganache. The malt flavour is a little light, so I might increase the powder if I make it again, but the flavour is so delicious that I'm wondering why malted milk truffles aren't a thing. 

The following day, after the ganache had fully set, I brought it back to room temperature and whipped it with a hand mixer. Sure enough, it became paler in colour the more I whipped it. I put the ganache in a piping bag and sat down to begin the process of matching graham crackers of a similar size and sandwiching them together with the whipped ganache. Then I put them in the fridge for a few minutes to set up. 

Next I tempered a lot of milk chocolate. More than I normally work with because I knew these chonky sandwiches would require a lot of chocolate. What I hadn't quite sorted out was how to dip them. I had a large fork used for dipping Oreo cookies that I thought would work, but the chocolate was a little too thick. While many recipes will instruct you to thin out the chocolate with Crisco or paraffin wax, in the chocolatier world, the viscosity of chocolate is more commonly altered using additional cocoa butter. That's not something I've ever tried and I also didn't have any on hand. And I couldn't bring myself to add a lesser quality ingredient to my expensive couverture chocolate!

And so I decided to try a technique I've seen while watching Hercules Candy on YouTube. "Quick Steve," as he is called, uses a puddle method for tempering chocolate and coating items, like snack clubs (pretzels coated in peanut butter enrobed in chocolate and rolled in crushed potato chips) or turtle pops (marshmallows covered in caramel coated in chocolate and rolled in pecans). I grabbed a few latex gloves from my pandemic allotment and thought it couldn't be that hard to fill one's hand with chocolate and coat a cookie sandwich.

I was wrong. 

This is not as easy as Quick Steve makes it look. I guess, like everything, it takes time to develop the technique, the coordination, the feel (and he's had a lifetime of practice). I did the best I could coating them, but it was messy as all heck. I also struggled to get good coverage on the edges. My kingdom for an enrobing machine!

Seriously, though, the hand coating worked better than the fork and I imagine if I did a few hundred of these, I'd get it down to a science. On a few I added a decorative swirl with my finger. And then I popped everything into the fridge to crystallize. 

The end result?

That's one delicious sandwich. I can understand why people still talk about them. I'd probably make a few tweaks if I made them again -- a smaller cookie cutter, a chocolate with a higher fluidity, a little more malt in the whipped ganache -- but I'm not angry at it. 

I'll be very curious to see how these store. One potential issue is the graham cracker absorbing moisture from the whipped ganache and softening as a result. If that does happen, then some sort of barrier, like a thin coat of chocolate on the graham cracker before sandwiching, might be necessary. Time will also tell if these will survive a freeze-thaw cycle. I've had a few requests to bring these home next month, and the whipped ganache won't be stable enough to sit for a month, I suspect. So into the freezer go a few of these for sure. 

Hopefully the recipients will enjoy them and savour a memory from childhood while they're at it. 

So much power in such a small sandwich.


Postscript: On day four, my boyfriend tried one and the graham crackers were completely softened, not unlike a wagon wheel. He still thought they were good. I personally have no idea if the original was crispy or firm when biting into it, or if it was softer and chewier. But maybe softer and chewier is ok? Someone who had the real deal will have to let me know! 


Abstract Expressionist Dinosaur Eggs

Last year, I made two flavours of Easter eggs: peanut butter fudge and strawberry cream. I was happy with the final products, but the process was incredibly frustrating. One egg mold I used, with 6 half-egg wells, was made of silicone. While I loved the decorative pattern it produced, the mold itself was floppy and hard to work with. (The solution to this issue is to cut silicone molds into pieces, but I find it very hard to dismember them despite knowing it will make my life easier.) I also used 4 half-egg polycarbonate molds. These are much easier to work with because of the rigid plastic, but you're limited by the number of molds you have and tempering chocolate for several small batches can be time consuming. So, after making all of my eggs last year, I ordered a new polycarbonate mold with 12 wells and tucked it away for Easter 2023. (I pause this blog so that Present Self can thank Past Self for looking out for Future Self...)

As I planned for this year's eggs, I realized that the new mold would change the techniques that I could use. I would be able to shell the molds the way were were taught to in my professional chocolatier program -- that is, fill the wells, invert the mold, and tap out the excess chocolate, instead of "painting" the chocolate into the molds. This got me thinking that I should try decorating the molds as well, as we did for assignments. But I needed inspiration.

After trying Hummingbird Chocolate a few weeks ago and remembering the chocolatiers who inspired me during my program, I decided to riff on Brandon Olsen's (CXBO) disco eggs. Having received a set of oil-based food colouring for my birthday, I purchased a small quantity of white chocolate and coloured it orange and teal -- orange to reflect the flavour of the eggs and teal because it's one of my favourite springtime colours. After polishing my polycarbonate molds, I grabbed a fork and used it to splatter chocolate over the molds in the abstract expressionist style associated with Jackson Pollock. (Side note: Brandon Olsen would have done this using coloured cocoa butter, not coloured chocolate, but I was making do with what I had.)

Next, I tempered some dark chocolate and shelled the eggs, using my drywall taping knife to clean the molds. (Don't worry, it's only ever been used for chocolate.) Not only was this significantly easier than last year, but it's also a much cleaner way of working and very efficient. I set the molds aside for a few days. 

When I returned to my project, the first thing I had to do was make the ganache for the centre of the egg. The first batch went off the rails, but the second batch was perfect. Flavoured with orange oil (not extract) and a sprinkling of pulverized freeze dried orange slices, the ganache had an intense, real orange flavour. (One thing that the professional chocolatier program instilled in me is a distaste for artificial flavours.)

Once the eggs were filled and the orange ganache had started to crystallize, I tempered some dark chocolate and capped the eggs, again using my drywall taping knife to remove the excess chocolate. 

The result? Eighteen abstract expressionist dinosaur eggs with creamsicle centres for Easter! I'm loving the way these look and I can't wait to heat up a knife and slice through one later today!


Picture it: Sydney, 2023

In these days of influencers and Instagram, it's common for content creators to project perfection. From flattering angles and elaborate set ups, to expensive equipment and special filters, the content we're being fed doesn't just seem unattainable, it is impossible. Still, many of us consume it like a Reese peanut butter cup (that is, we devour it and want more). 

If that's what you're looking for, my friends, then I'm sorry to inform you that you've come to the wrong place. I don't have special lighting. I don't have the patience to spend more than a minute positioning something for a photo. I'm not going to remove every background object in the camera's view so that you aren't distracted by visual clutter. And I don't hide my fails -- mainly because I hope that as you read about them, you have a bad laugh at my expense.

Picture it: Sydney, 2023. A forty-something aspiring chocolatier has begun Easter prep. Having carefully assembled her ingredients, she is ready to prepare the flavoured ganache that will form the centres of dark chocolate eggs. She dons her skull rag and Birkenstocks, and enters her tiny (7x9) galley kitchen.

As she has done many, many times before, she begins the process to make a beautiful, luxurious, white chocolate-based ganache. She stirs with a whisk, making quick, small circles in the centre of the bowl, coaxing the chocolate and other ingredients into emulsion. And just when it should be pulling together, the unthinkable occurs: the ganache splits. In a most epic fashion. First, it just looks grainy, curdled. But as she tries to whisk it back into shape, it gets worse. About a half inch of oil rises to the surface, with the chocolate solids in a putty-like mound at the bottom. She tries all of the tricks to fix it -- using an immersion blender, adding hot cream... Her efforts are futile. 

Let me tell you, I've never seen anything quite like it. The flavoured oil splashed on my clothing, across the counter, onto the stovetop. I left an oily residue on everything I touched. I ran out of paper towels trying to clean it up and then used a dish towel (which I had to hand wash to remove the orange oil before it could be laundered). 

As a final desperate last-ditch effort, I found some leftover white chocolate in my stash, melted that down, and slowly whisked the split ganache into it. This time I did get an emulsion, but it was still grainy. It was like there were small grains of chocolate that just refused to melt out. Despite the fact that it set up, the mouth feel was terrible. It was a failure.

Now, I'm not used to failures in the kitchen. I was baffled. I was stunned. I was deflated. I got in the car and immediately drove to Bulk Barn to buy more white chocolate to try again another day when the chocolate gods (who I assume are Mayan) will favour me.

But man it stuck with me all day. I read about ways to save split ganache and the causes of it. Had I overheated the chocolate? There's a reason we talk about chocolate being in temper. Did I add my flavour and colouring too soon? Was there something wrong with the chocolate itself? Could I whip it and use it on cake? Was there any saving it? Or was that $14 worth of ingredients down the toilet? (Not literally, of course, because that would cause plumbing issues.)

Don't get me wrong, it wasn't the money that bothered me, but the waste of chocolate. Chocolate -- good chocolate -- is precious in a world of confectionary coating masquerading as the real thing. I just couldn't stomach throwing it in the garbage. 

After sleeping on it, I decided to do one last search for techniques to save it. I found one that was unconventional. It suggested chopping up the set ganache, melting it down in a pot directly on the stove, and re-whisking it once it started to melt. It couldn't hurt to try it, so I followed the instructions and watched with vigilance so that the chocolate wouldn't burn. Despite being very effective in creating a good emulsion, it did nothing to sort out the graininess. 

Disappointed, I looked away for a moment to think. There had to be a way to save this ganache. I pride myself on my problem solving, a skill I inherited from my father. No matter the challenge in front of him, he always finds a way to overcome. (He would have made a great engineer.) "Think, Squirrel, think, think, think," I urged myself. And that's when my eyes spied a mesh strainer in the drying rack. Would ganache flow through the tiny holes? Would it still set with some of the solids removed?  With nothing to lose, I poured the entire pot of melted ganache through the strainer and into a bowl. And sure enough, the resulting mixture looked just as smooth as it should have the first time. I grabbed a small spoon and sampled it. All traces of graininess gone. I gave it one last whisk and put it on top of my toaster oven to set while I started a new batch to use in this year's Easter eggs.

You see, this ganache definitely doesn't meet my quality standards for this year's "production run" given everything it's been through (or should I say everything we've both been through together), but at least now I can use it in a dessert. Maybe an orange chocolate tart with a cookie crust...

Some days, being a chocolatier isn't all truffles and pralines. Some days, it's humility and perseverance. 


The orange truffle tart with cookie crumb crust and vanilla bean whipped cream. Not bad for a fail. Tastes like a Creamsicle or Buried Treasure. 


"I do not think it means what you think it means."

Back when I did my professional chocolatier program, I wrote a blog post titled, "What the heck is a truffle anyway?" On the surface, the term seemed simple, especially for anyone who's enjoyed a Lindt milk chocolate truffle at Christmas (perhaps following a Festive Special at Swiss Chalet, but I digress). 

Throughout the course, "truffle" was used to refer to both bonbons of a particular shape and ganache-based confections generally (including those cut into squares and those molded into a variety of shapes). I remember discussing this with my friend and colleague, the late Robert Campbell. He felt it didn't matter what a truffle was made from, so long as it was produced without a mold and resembled a truffle (the fungus). But the proliferation of "truffles" made from cookies, cookie dough, cake, and other ingredients that are coated in candy melts -- and devoid of any real chocolate -- give me pause. As my thinking on it has evolved, I believe it's part form and part formula, so for me it's a hand-formed, ganache-based confection in a spherical or conical shape. 

As I continue reading Notter's The Art of the Chocolatier, I once again find myself questioning a word I thought I understood: praline. I've always known the term to refer to a caramelized, nut-based confection (one that, in my mind, is crunchy) -- yet in front of me is a recipe for a butter ganache praline that doesn't contain any nuts and definitely isn't crunchy. 

In my head, I can hear Inigo Montoya from The Princess Bride saying, "You keep using that word. I do not think it means what you think it means."

And so down the rabbit hole I go -- it's hard not to as a researcher. 

As it turns out, there are multiple uses of the term praline. It can indeed refer to a nut-based confection, usually almond or hazelnut, as I had thought (turns out that one is French). There's also an American praline, where pecans are combined with sugar and cream, resulting in a fudge-like confection. And in the Belgian use of the term, praline can refer to any soft centre contained within a chocolate shell. Regarding the latter, pralines have apparently always exhibited significant variety in terms of shape and flavour, are more sophisticated in their decoration than truffles (which tend to be simple, more rustic), and are popular in gift boxes. 

Now, that last description has me thinking. That blueberry iceberg bonbon that I made during my chocolatier program? That seems closer to a praline than a truffle, given that it was comprised of a molded dark chocolate shell hand painted with coloured cocoa butter and filled with a soft blueberry white chocolate filling. 

That leads me to two thoughts:

First, there should be a game called Truffle, Praline, or Bonbon? and the prize should be chocolate.

Second, I wish I could pick Robert's brain in the cafeteria one more time and discuss in depth the term praline. 

Rest easy, friend. You will be missed.


Pear in a Bottle?

During last Monday's dedicated reading time, I finally cracked open Notter's The Art of the Chocolatier. Not surprisingly, it started with a history of chocolate, the cultivation of cacao, and the transformation of chocolate as it moved from one culture to another across the globe. But I wasn't expecting the descriptions of "other ingredients" employed by chocolatiers to be so interesting. In particular, the section on alcohol in chocolate, and specifically brandy, was eye opening.

Dark chocolate blueberry truffle made with Island Folk Cider House blueberry cider.
I've experimented with alcohol in chocolate on more than a few occasions. While training, I made a port wine truffle as one of my assignments. I've also made truffles with local beers and ciders - pictured here is a dark chocolate truffle flavoured with Island Folk Cider House blueberry cider and rolled in pulverized freeze dried blueberries. Most recently, I made cointreau truffles following the Notter recipe. As I've tested these recipes, I've observed the interesting effects that alcohol has on the texture of the ganache and enjoyed the flavour possibilities (though it's clear from my circle of chocolate testers that alcohol in chocolate is divisive).

Brandy, however, is a bit of a foreign concept to me.

Apparently my grandmother kept a bottle of apricot brandy in her fridge. Not that I ever saw it, of course, but my aunt Rosella told me about it back in the late 1990s. You see, my grandmother also kept a bottle of apricot brandy in Rosella's fridge for when she was visiting the east coast. Years after nan's passing, while I was "in town" pursuing my undergraduate degree in music, Rosella still had her apricot brandy in the crisper drawer of her fridge. I don't know if Rosella ever drank any of it, but it was clear that the bottle had meaning for her.  

Apricot brandy doesn't make it into Notter's book; he instead focuses on Kirschwasser (cherry) and Williams pear. The description of Williams pear brandy is fascinating:

"Many bottles of Williams pear brandy are sold with a pear inside. To achieve this, growers hang empty bottles on their trees and insert the young fruit buds, which are trained to grow inside the bottles until the fruit becomes fully matured and ripened. The bottle and pear are removed from the tree and carefully cleaned. The brandy is then added and the bottle sealed." (Notter, The Art of the Chocolatier, page 24)

Now, I've heard of a letter in a bottle. I've seen a model ship in a bottle. I've even danced to the song "Genie in a Bottle" during my clubbing days. But a pear in a bottle? It feels like a "when I see an elephant fly" moment. Finding one also sounds like exactly the sort of quest that my nerdy self enjoys, so it's going on the bucket list!

First, though, I think I should find a bottle of apricot brandy to toast my grandmother. And I'm adding "develop an apricot brandy bonbon" to my list of chocolate inspiration. That's the point of this Monday-night chocolate exploration, of course - to identify new techniques and flavour combinations that I can work on to advance my craft. 

Prost! 

Returning to Chocolate

I've been on hiatus from blogging for longer than I realized. It was surprising to log in this morning and see 2018 as the year of my last post. In 2023, I'm hoping to get back into blogging and trying new chocolate techniques, which was a focus of my writing in 2018 when I did my professional chocolatier course. 

Cover of Ewald Notter's Art of the Chocolatier
The inspiration for this reorientation came late last year. As I was planning my four-piece chocolate box for the year, I turned to Ewald Notter's The Art of the Chocolatier and found a recipe for a cointreau truffle that used butter instead of cream. I decided to try it. I made a half batch and was thrilled with the results -- the ganache was easy to work with and the shelf life would be longer than one made with cream. 

I scooped the centres, refined the shape into a sphere, and then rolled them by hand in two coats of tempered chocolate. They were delicious. 

But while I had followed Notter's recipe, I didn't attempt his method, which called for piping the ganache onto a chocolate disc and then dipping the piece into tempered chocolate. The resulting truffle would have a sort of peaked dome shape. I didn't have the time to experiment with this technique before Christmas, but made a mental note that I should try it in the new year.

The cointreau truffle joined a spiced molasses honeycomb toffee enrobed in chocolate, a salted caramel enrobed in milk chocolate, and a white chocolate fruit and nut cup featuring dried cranberries and pistachios. I packaged 24 boxes to give out to family, friends, and colleagues. They were a hit.

Over Christmas, I reflected on my chocolate training, as well as my desire to continue learning new techniques and to maintain what I've already learned. I decided that the best way to do this wouldn't be to register in another course, but to commit to self-directed study. Notter's book is the assigned reading for Monday nights going forward. And I'm excited to try new recipes and techniques in the not-so-distant future!

And that means, I hope, the return of this blog.

Happy 2023!


What the Heck is a Truffle Anyway?

If you've been following my journey in the Professional Chocolatier program, then you realize by now that there are specific guidelines that have to be met for each assignment. Having completed a caramel, I was on to my next adventure: a truffle (not a ganache made with cream).

Now, I had understood to this point that a truffle was by definition made with ganache and that the definition of ganache was a combination of hot cream and chocolate. So, what exactly was I being asked to make? Confused, I spent a lot of time researching truffles. Most sources stated it was ganache formed into a ball or cone shape and coated in something (chocolate, nuts, cocoa powder). Were the instructions saying that ganache was off limits? Or was it only cream-based ganache that was off limits? And on the school's website I found a recipe for a ganache truffle that was a flat rectangle. So does truffle refer to the centre or the shape or some mystery still to be revealed? Maybe I was over-thinking this, but it seemed like an oxymoron (creamless ganache, ganacheless truffle). Reviewing the assignment again, I saw that the example was a butter truffle, so I began searching for truffle recipes without cream (God bless boolean operators) and found recipes for "water ganache" and wine and butter based truffles. I also found recipes for "pot truffles," but decided that probably wasn't what they intended with this assignment. Eventually, I decided to make a wine-based truffle.

Lucky for me, I had some Newman's port wine left in my cupboard. I prepared the ganache (without cream) and slabbed it, then let it crystallize for 24 hours. Once it was ready for enrobing, I cut it into 1" squares, dipped them in dark chocolate, and decorated them according to the assignment requirements -- a piped decoration made with a contrasting chocolate that had been tinted using candy colours. I chose to combine candy red and sky blue to produce a sort of winey pink colour.

I realized through this process that 1" squares are a little too big when enrobed, not that anyone would really quibble about having too much chocolate, I suppose. Nevertheless, I was really happy with the flavour of the port wine and dark chocolate together. And they looked good too. I do need to practice my enrobing technique more, though. I guess that just means more truffles and bonbons in the future? Or maybe just bonbons. Afterall, I'm still not sure what the heck a truffle is.


Putting the Temper in Temperamental

Over the course of a four week period, I have to develop 5-6 recipes for two assignments in my professional chocolatier program. Because I have to travel in March, I wanted to get started early to make sure I had enough time to complete everything (I am Type A, after all). Consequently, last weekend, I started my first recipe development assignment and spent my Friday evening making marzipan and espresso ganache, both of which turned out extremely well. It was the first time I'd made marzipan and I loved the flavour of the finished product -- much better than anything I could have bought around town. I layered it in an 8x8 pan with the espresso ganache and then left the ganache to crystallize for about 30 hours. I went to bed feeling pretty impressed with myself.

Then on Sunday morning, I set up my kitchen for the day and retrieved the layered slab. My first task was to cut the slab into centres. This was not as easy as I'd anticipated. With a large chef's knife, I made long cuts through the ganache, which was firm, but sticky. After every cut, I had to clean my knife. Quickly I learned the value of a guitar cutter and why chocolatiers prioritize it over other types of equipment. (Mental note: add guitar cutter to the business plan.) Eventually, I had 64 centres ready to be enrobed, but I was very worried about how such a soft ganache would perform in the enrobing process.

Next I tempered my chocolate. The temper test set perfectly, so I was ready to proceed (or so I thought). With confidence, I picked up a centre with my left hand, tossed it into the chocolate with the ganache layer facing down, flipped it over in the chocolate so that the marzipan was now on bottom using a dipping fork in my right hand, tapped to remove the excess chocolate, and set it down on a tray. Then I placed a toasted slivered almond on top. It looked beautiful!

And then I did the second one. Not so beautiful. And the next one -- same thing. The top looked great, but the bonbons didn't want to come off the dipping fork. They were sticking. I tried a different dipping tool. Sticking. I tried regular forks. Still sticking. I cleaned my dipping forks and tried them again. I wanted to scream! After about 18 bonbons, I stopped. Something wasn't right.

I wasn't sure what the problem was, but I wondered if the chocolate wasn't in perfect temper (perhaps it was over-crystallized). So, I heated my chocolate back up to 46 degrees to break down the crystal structure and re-tempered it. About 20 minutes later, I did another temper test (which once again set perfectly) and then returned to my enrobing. I had much more success. This time, there was no "sticking" to the dipping fork. I did find that my dipping fork was too big (the tines too far apart) for my centres, but I switched to a different dipping tool and finished off the batch. By the time I was done enrobing 64 centres and cleaning up my kitchen, I was exhausted, but also very happy. 

I had just learned a very valuable lesson: chocolate puts the temper in temperamental. It isn't simply "in temper" or "not in temper." Instead, there is a continuum of temper (I feel like I'm back in grad school writing a paper on identity...). But I'd recognized the problem and I'd fixed it, which is the whole point of these assignments -- putting theory into practice. I also learned just how valuable a tempering machine is in this sort of process. There is enough to do in the dipping of centres and placing of decorations that you don't want to also have to worry about doing the heating pad-heat gun tempering dance.

Based on the feedback I've received, this flavour combination is a winner. What would you have paired with marzipan?