Basque Burnt Cheesecake

Before Christmas, I was watching an episode of Crime Scene Kitchen during which the mystery dessert was Basque burnt cheesecake. I had never heard of it before, but resolved to try making it.

Now, as much as I enjoy baking, cheesecake it not something I've ever bothered with. It's too finicky. Too precious, as the cool kids say these days. You'd swear you were handling an explosive device. All of the ingredients have to be at room temperature. You have to use a water bath. Bake it low and slow, and aim not to get any colour on top. Leave it in the oven to cool before putting it on a counter to cool before putting it in a fridge to chill. Pray. Do everything possible to ensure it doesn't crack or collapse. And then when it inevitably does, try to disguise it with artfully arranged toppings. 

No thanks. I'm good. I've seen this show before and know how it ends. (I'm not pointing any elbows, but someone reading this blog has made a delicious orange cheese several times now and no matter what they do, they still face the heartbreak of massive fault line every time.)

Basque burnt cheesecake is entirely different. You bake it hot and fast, seeking a dark colour on top that gives a hint of caramel flavour. When you remove it from the oven (immediately after baking), you want it to collapse and crack. No sacrificing of a goat required here. This one is foolproof. 

So how does it taste? 

Absolutely delicious. I was a little suspicious when I first took it out of the oven, worried that it might be too eggy or have more of a soufflĂ© texture. As it turns out, my fears were unfounded. It was creamy and not overly sweet. Topped with dulce de leche, it made a perfect dessert. I can only imagine that a fruit compote on top would be spectacular as well. 

If, like me, you don't have the patience for traditional cheesecake or if you've been intimidated by the usual process (or if maybe you've angered the baking gods and have had multiple failures), I highly recommend giving Basque burnt cheesecake a try. It will make a superstar out of any novice and you can save the angst for something more deserving. 

Rocher

Think back to your childhood. When a box of Pot of Gold chocolates was opened at Christmas, what piece did you go for first? A caramel perhaps? One of the flavoured creams? Maybe the large solid piece in the centre? All good options, to be certain, but my go to was the coconut cluster in the little paper cup. I loved it. The sound of the paper being peeled away from the chocolate. The crunchy texture of the coconut combined with the creamy milk chocolate. Perfection.

Nut clusters are the unsung heroes of chocolate assortments. While truffles and caramels and creams are more technical to produce and much beloved for their smooth centres, it's the nut cluster that that dares to be different and provide the contrast in a collection. Most years, I've included one in my own Christmas boxes for this very reason. A cashew cluster, a peanut and raisin cluster, a craisin and pistachio cluster, a coconut cluster -- they've all been delicious. And, conveniently, they are incredibly easy and fast to produce. 

As it turns out, the fancy term for a nut cluster is rocher. I learned this tonight while reading Greweling's Chocolates and Confections. Certainly, I've heard and seen the word before (we're all familiar with the famous Ferrero Rocher), but I never gave it much thought or looked for a definition before. Rocher is the French word for boulder or rock. And, when you think about it, a mound of nuts held together by chocolate does give the appearance of a boulder or rock.

As I continued my reading, one of the rocher flavour combinations suggested was macadamia nuts and crystallized ginger. Frankly, that sounds divine to me. As a dried apricot lover, I can't help but wonder if they would be good paired with almond slivers. So many options, so little time!

What fruit and nut flavours would you combine? 

Dulce de Leche Espresso Hearts

During the reorganization of my chocolate supplies a few weeks ago, I found a heart mold that I had purchased during my professional chocolatier program but never used. With Valentine's Day quickly approaching, it seemed like an ideal opportunity to test it out. And then after reading through ganache recipes one Tuesday night, I was inspired to try making a milk chocolate heart filled with dulce de leche and espresso ganache.

I chose milk chocolate for a few reasons. First, I have a lot of it because I primarily use dark chocolate in my production. Second, because I gravitate toward dark chocolate, I don't have enough experience tempering milk chocolate. As well, I haven't employed the piping bag method of shelling chocolates using milk chocolate. Guaranteed to be more tricky than dark chocolate, I wanted to try it. And practice does make perfect, right?  

These dulce de leche espresso hearts were a multi-step process: decorating the mold, shelling, piping the dulce de leche layer, piping the ganache layer, capping, and packaging. I spread these out over two weeks partly to make it more manageable and partly because I didn't realize how close February was and didn't buy cream with my groceries (and after 16 hours of writing spread over two days, I just didn't have it in me to run out to the store). 

Session One: Decorating and Shelling

I began by tempering some coloured cocoa butter to decorate the mold. Now, I just have to say that I was thrilled to finally try this again, since I hadn't done it in years. I purchased gold Roxy & Rich cocoa butter back in December when I replenished my dark chocolate supply. I've wanted it since 2018. And now it is mine! (My precious...)

Tempering coloured cocoa butter is easy. It just requires patience. You remove the cap from the bottle and pop it in the microwave for 10 seconds, then remove it and shake. Then another 10 seconds, remove, shake. And another 10 seconds, remove, shaky-shake. You get the picture. You progress in this fashion for about 1 minute and thirty seconds and eventually some of the cocoa butter melts while some of it remains solid. And by shaking, you ensure the temper of the cocoa butter. 

I dispensed a small amount into a pinch bowl, rolled a latex cot over my finger (thank you Shoppers Drug Mart), and then finger painted the molds. I decided to swipe only once from top right to bottom left, and in less than a minute I was done. The encouraging part of it all was that the gold cocoa butter began to solidify almost immediately, so I knew it was in temper. 
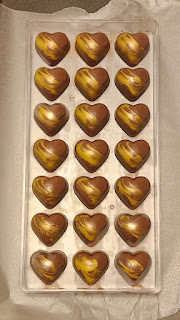
Next, I tempered 350 grams of milk chocolate and filled a piping bag. Using the "human depositor machine" method, I filled each heart, tapped the mold to remove air bubbles, and then inverted the mold to let the excess chocolate drain out onto a piece of waxed paper. Then I placed the mold on a tray in the fridge for 10 minutes. Now, I didn't quite get all of the air bubbles out and the shells are a bit thick in spots, but I was happy with the results nevertheless. It's a much cleaner way of working and in the future if my chocolate is just a little warmer and I tap it a little longer, I think I can solve the issue of it setting too quickly. (Yes, this means there will be more milk chocolate bonbons molded in the future.)

At this point, I set the shelled mold aside to await the next steps. 

Session Two: Layering Dulce de Leche and Espresso Ganache

The second production session occurred on a Sunday morning, passing the time during snowmageddon. I started by making a small batch of milk chocolate espresso ganache, so that it could cool while I was piping the dulce de leche layer. I measured heavy cream, butter, espresso powder, and milk chocolate into a bowl and went the old-fashioned bain marie route to melt it all together. About 10 minutes later, I had a beautiful ganache. I removed it from the heat to cool. 

Next, I poured my dulce de leche into a piping bag. With right hand applying pressure by squeezing the bag and left hand controlling the flow by pinching about a half inch above the opening, I very slowly deposited a small amount of dulce de leche into each heart. The dulce de leche was very fluid and shouldn't set while inside the chocolate, so the hearts should ooze when bitten into. 

Then I checked the temperature of the ganache. While it was starting to set, it was still 37 degrees -- far too hot to pipe into the mold because it could take the shell out of temper. I gave it a good stir and left it for ten minutes. Still too warm when I checked it, I left it for another fifteen minutes. When I returned, it was at 27 degrees, so I knew it was safe to pipe. 

Using the same method as for the dulce de leche, I quickly piped the ganache over the first layer. This part was tricky. To avoid the heavier ganache sinking through the dulce de leche and creating a total mess, I had to pipe at an angle across the surface of the dulce de leche faster than it could ooze upwards. For the most part, it appears to have worked well. With a toothpick, I knocked down any ganache peaks that were high enough to impede capping. Then I left the ganache to fully crystallize on top of the dulce de leche. 

Session Three: Capping

Still snowed in, the third session occurred early on a Tuesday morning. I gathered my supplies (chocolate, a silicone bowl, a piece of acetate, and a drywall knife), and prepared myself for capping. It can be tricky business and it's critical for shelf-life.

First I tempered a small amount of milk chocolate (but also about 4x more than I needed). After two temper tests to ensure it really was going to set properly, I spooned three lines of chocolate onto my mold -- one at the top of the mold, one along the second row of hearts, and one about half-way down the mold. Then I lined up the edge of the acetate with the edge of the mold and scraped across the full mold with the drywall knife. I've tried this method several times, but this was the first time that I got the right amount of chocolate on the mold. After admiring my work for a brief second, I cleaned up the edges (and snapped a photo) and put the mold into the fridge for 13 minutes.
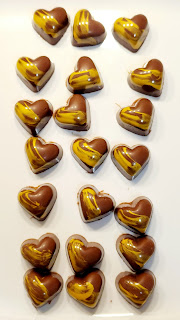
Next, I inverted the mold onto a tray and lifted it to see if any would fall out on their own. None did. In the past, I have tapped the edge of the mold on the counter to release the chocolates, but inevitably a few (or many) would come out cracked as a result (I guess I was probably tapping with too much force). So, instead, this time I tapped the mold with a wooden spoon, as I had seen in an Instagram reel by Kate Weiser Chocolate. Sure enough, one by one, the hearts dropped cleanly from the mold. And when I moved aside the mold and spoon to assess my work, I was absolutely thrilled. The shine on the chocolates was incredible. 

Session Four: Packaging

A few days after finishing these hearts, I checked my stash of packaging and confirmed what I already knew: I didn't have anything suitable for single chocolates. I have a large quantity of 2-piece and 4-piece boxes, as well as a variety of cellophane and paper bags. Alas, nothing for one piece. It was time to get crafty.

And so I went onto the Silhouette Design Store to look at cut files for boxes. Eventually I found a simple triangular box that should work. I downloaded it and began manipulating it to get the right size and fit as many on a single piece of cardstock as possible. After a few tests, I cut one dozen boxes and assembled them.

I popped each chocolate into a mini cupcake liner (so that the chocolate wouldn't come into contact with the cardstock that I used) and then carefully slid one into each box. I folded down the flaps and closed the boxes with heart stickers. Then I put them in an airtight container to await their delivery. 

Final Thoughts

As I finish writing this blog, I haven't tried one of my dulce de leche espresso hearts yet. I've tried all of the components, but I won't know how they work together for certain until sometime next week when I permit myself to indulge. But I can say that I'm very pleased with how they came together. The design is precisely what I envisioned, the milk chocolate is in perfect temper, and thanks to new production techniques the work was more controlled and cleaner. And this is the first time ever that I've had all pieces completed in sellable condition - no major bubbles, no marred finishes, no cracks, and no bloom. 

In short, I'm thrilled.

Happy Valentine's Day or Galentine's Day or Whatevertine's Day! 

Any excuse to eat chocolate, am I right?


Antique Sideboard Glow Up

Over Christmas break, I thought a lot about the need for a better storage solution for my chocolate supplies. As my collection of molds, flavourings, colorants, and tools has grown, I've tried a variety of solutions. First there was a cute blue rolling cart that I found in the trading area of my building. Then when I moved my baking supplies into a new cabinet, I repurposed the Rubbermaid cart for molds. Soon there was a pile next to these carts and everything started looking cluttered.

And so I spent some time over Christmas looking at options available to me. There wasn't much in stock at Canadian Tire or Home Depot, and what was available seemed expensive given that it's made of MDF. I considered ordering from Amazon, but then worried about it arriving damaged (or it being dropped in the lobby while I am at work). As much as I would love a trip to Ikea, I knew I wasn't likely to do that before the spring. 

I started contemplating the secondhand options in town and then did something I never do -- I looked at Facebook Marketplace. I quickly found a number of listings for sideboards at a used furniture store in a nearby community and decided to make the pilgrimage there for when they opened the next day. 

When I arrived, they were loading furniture onto the truck and they commented that if I picked out something in the next 20 minutes, then they would deliver it the same day. No problem, I thought, as I strolled around. I walked the perimeter and stopped in front of an antique sideboard unlike any other in the showroom. "I'll take it." The guy was a bit dumbfounded by how quickly I made the decision, but then flipped the sign over to SOLD without missing a beat. (I also picked out a new chest of drawers for my bedroom to replace a collapsible, cloth wardrobe.) I quickly paid and then headed straight home to clear a path for the sideboard that would have to roll past the Christmas tree and presents. Two hours later, it was in place. 

Now, this tiger oak wood sideboard needed a little love. The spindles holding up the top shelf were spinning freely and had to be toenailed into place. The mirror was rattling with every movement and needed the wooden backing put back into place. A few pronounced scratches needed to be coloured with a wax pencil and furniture marker. The molding along the top shelf had to be glued and clamped into place. The drawers required some shelf liner and one needed a cutlery tray to be functional. My boyfriend and I (but mostly my boyfriend) tackled each task over a two week period while waiting for new pulls to arrive.

You see, a few of the wooden pulls were missing and broken. And while it was tempting to try to match the originals, I had in my head that it needed a bit of an art deco vibe with glass drawer knobs. Green glass drawer knobs, to be exact. They couldn't be procured locally, but Amazon was happy to bring the world to my door. We struggled to install them because each section required a different length of screw, but we persisted. And I'm glad we did. 

One last piece that bothered me was that only one of the three keyholes still had its brass plate. If I could, I wanted to replace those as well. I had little luck with my searching until I discovered the term "escutcheon," which according to Google is "a flat piece of metal for protection and often ornamentation, around a keyhole, door handle, or light switch." Who knew? Armed with that term, I quickly found what I was looking for and ordered them. The installation was tedious, but not difficult. We completed the three over a 2-day period. And when I say we, I mean my boyfriend carefully widened the keyholes with a hand file until the escutcheons fit. He's been a great partner in the glow up of this sideboard. 

The storage space inside is incredible. All of my chocolate molds fit in the bottom drawer. The left side of the middle section contains all of my chocolate supplies, while the right side is now storage for board games. The top left drawer contains my Aunt Mona's cutlery, making it much more accessible for entertaining. And the right drawer contains some seasonal stoneware.

It will take some time to decide exactly what to put on top of the sideboard, since the mirror will reflect everything, but for now I'm loving this as the home for my green glass decanter, a gift many years ago from my late Aunt Rosella and Uncle Mike. A treasure from our antique and flea market days in the late '90s, this Italian blown glass piece features an ice chamber for chilling white wine. I have a few more pieces of green glass that may also suit the vibe. 

Until then, I couldn't be happier with this restoration. It feels like this sideboard was meant to be with me.

If you're curious, here's the before pic: